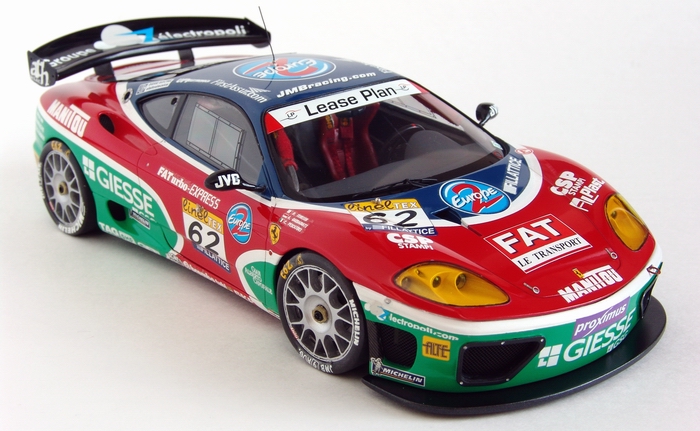
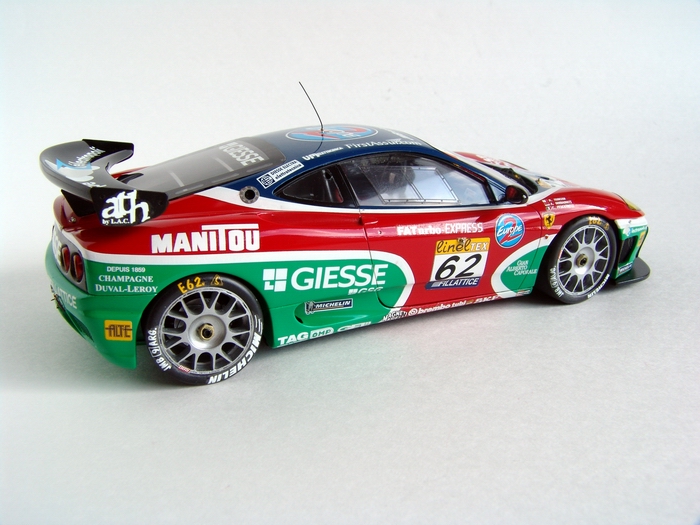
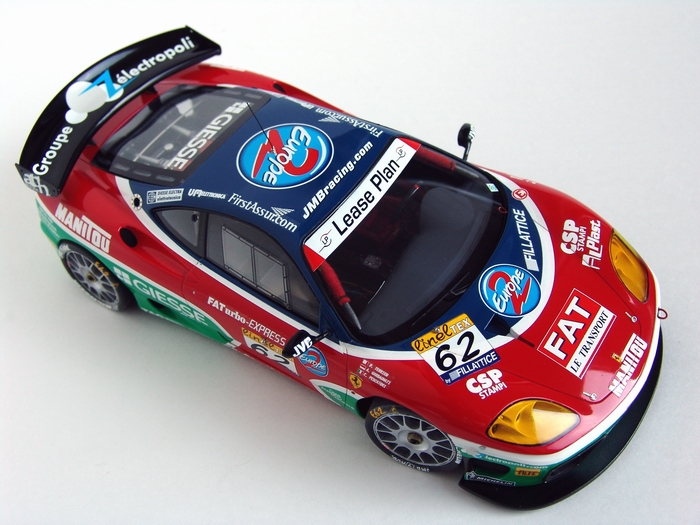
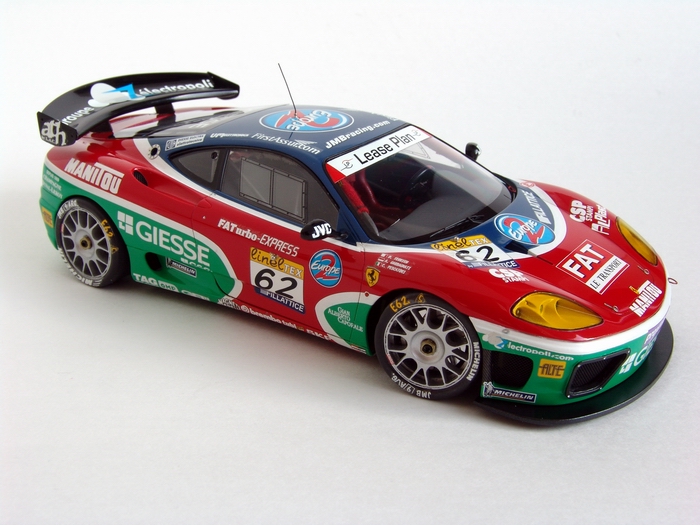
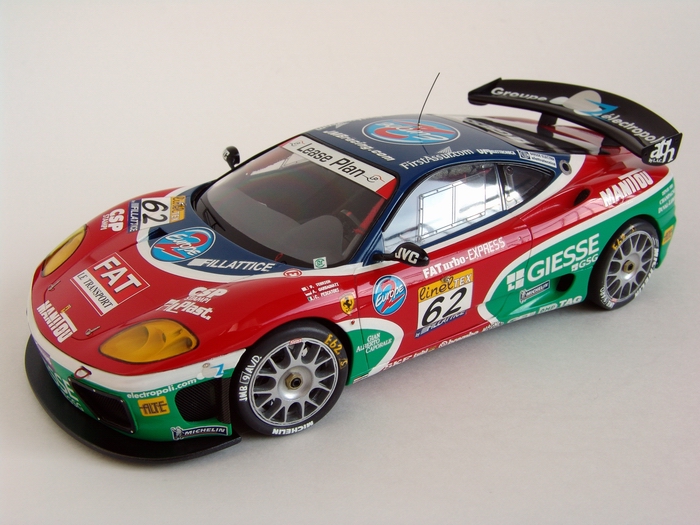
F e r r a r i 360GT, JMB Racing, 24 Heures de Spa Francorchamps 2001
 |
 |
 |
Kit: 1/24 Tamiya 360 Modena kit # 24228 and 1/24 Renaissance Ferrari 360GT transkit # TK 24/105
Pros: Transkit includes nice set of resin parts- front bumper, NACA
duct, rear wing, racing seat, 4 BBS rims, fire extinguisher and some minor
parts. Resin castings are good, except the wheels - they are a little rough
and incorrect.
Also included are 4 tires (ok quality), 2 beautiful PE frets (one brass one
nickel plated) with more than 100 parts, several turned parts (including
exhaust tips and pneumatic jacks), sliding windows, and excellent decal sheet
with all correct markings.
|
 |
 |
 |
|
 |
 |
 |
Buildup
This buildup was also published in Scale Auto, October 2003 Volume 25, Number 3, Racetrack-ready Ferrari
 |
Front bumper of Modena was cut off the body using jewelers saw, and new resin bumper sanded and test fitted to the body. Resin bumper was very good, and required almost no sanding at all. The body was primed with Tamiya gray sandable primer. |
 |
Then I scribed door lines, added same thickness styrene strip to the top part of the door panel, and cut the hole in the middle. Everything was smoothed with sanding sticks and carefully sanded with fine sandpaper. Done! |
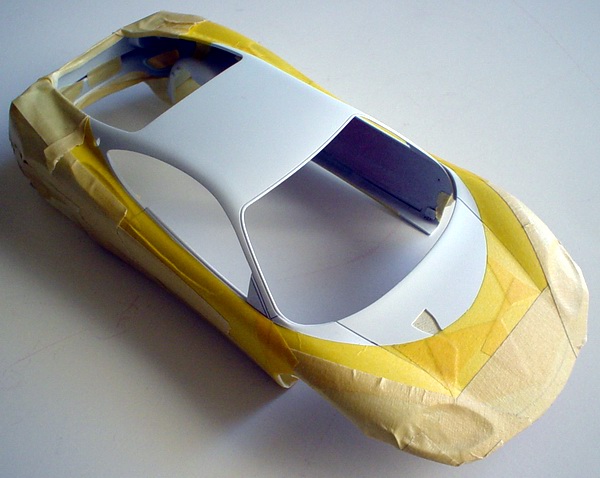 |
Then I primed body with Tamiya white primer and started masking. When dealing with complex painting schemes, I always make a copy of the decal sheet and use the copy as a template for all my masking. Here you can see the body ready for the first color coat - blue. I used custom mixed blue lacquer. |
 |
Dashboards was removed from the interior tub, 3 air vents were drilled out, and I also cut housings for the roll cage. Then I sanded away stereo faceplate and other switches and regulators from the central panel, and carved out the instrument cluster (not finished in this picture). |
 |
I sprayed about three mist coats and one wet coat to get required paint coverage. When paint was still tacky, I removed all masks and left the body dry for two days. The paint became slightly textured as it cured, but nothing good polishing can't fix! |
 |
Dash was sanded with fine sandpaper, primed and painted with Tamiya X63 German Gray. Air vents were blocked by thin styrene circles covered with C/F decals. I also decaled central panel and added 8 switches made from thin wire. Instrument cluster, number decal and metal transfer were also added. |
 |
When blue coat has dried, I masked it and the areas to be painted green with masking tape. I was careful to burnish tape really well at this stage to avoid paint bleeding under the masks. |
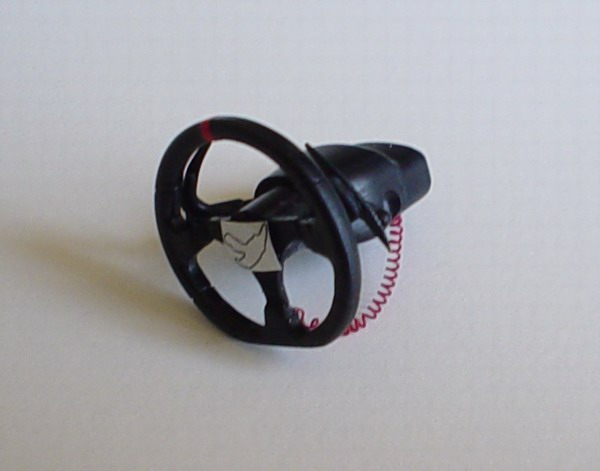 |
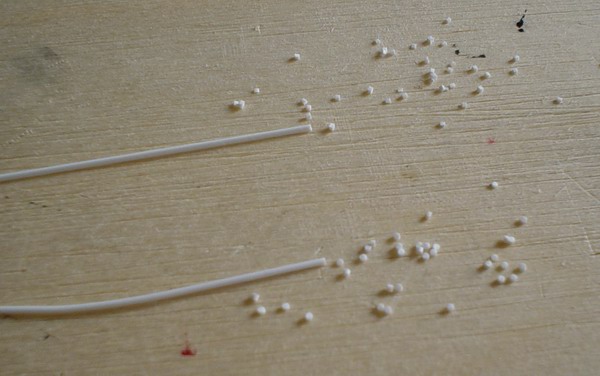
Next, I reshaped the steering column, glued enlarged PE shift paddles, and cut out the center of the steering wheel. The rim was re-shaped, and glued to the new "racing" wheel center which was topped off with route decal. Finally I added some coiled wire made from DM detail wire wrapped around thin steel rod. |
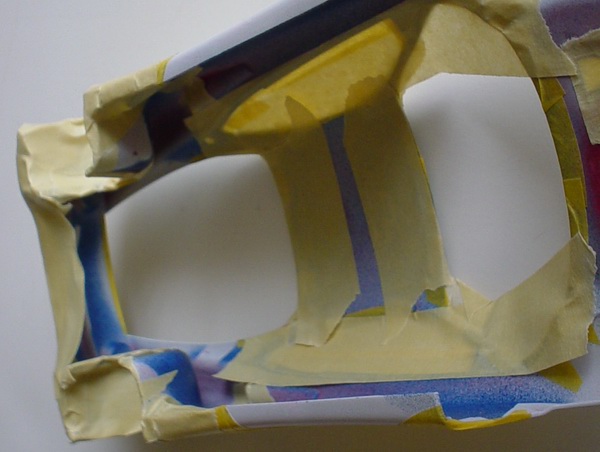 |
Make sure you also mask every little hole inside, including windows, all cooling openings, holes that were drilled, and everything else where paint could get. I used Tamiya TS-8 Italian Red rattle can to paint red portion of the body. |
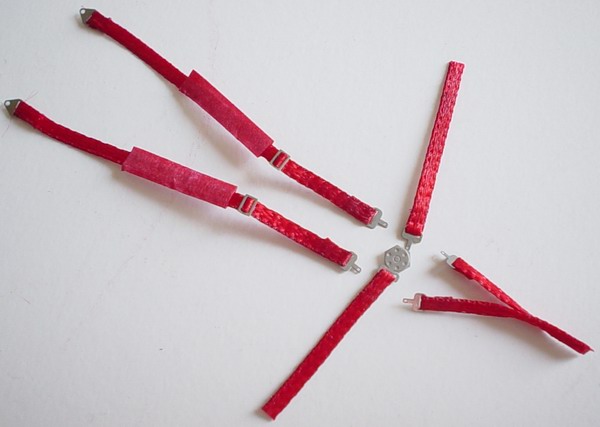 |
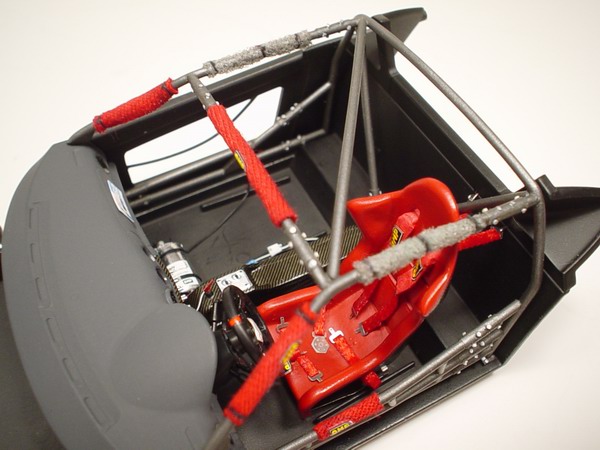
Racing harness was assembled using thin 1/16" ribbon from a craft store and PE hardware from the transkit. Seatbelt padding was made from thin paper colored with felt permanent marker. |
 |
Again, while paint was still tacky, I removed all the masks, and let the paint dry for about two days. Tamiya paint is very fast drying, but I wanted to be safe. The paint scheme started to take shape. |
 |
Hand brake housing and cup holders on the central tunnel were sanded off and puttied. When putty has cured, I sanded the tunnel smooth. At this point I had planned how I will run all the wires and started drilling a lot of holes! |
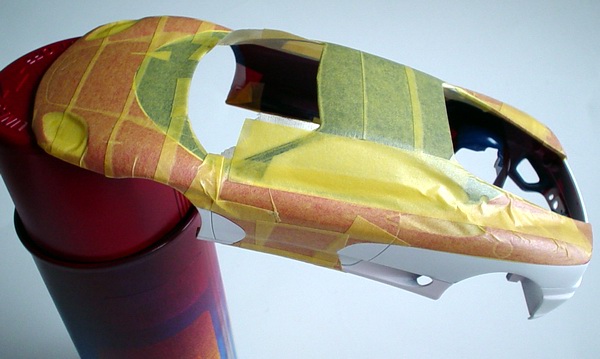 |
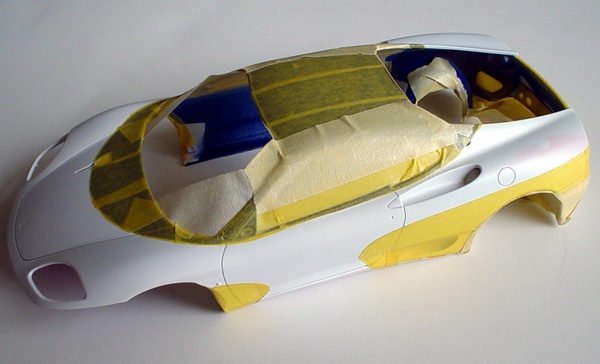
Final masking stage - masking everything again! Now blue and red were covered with masking tape and only small areas to be painted green remained unmasked. |
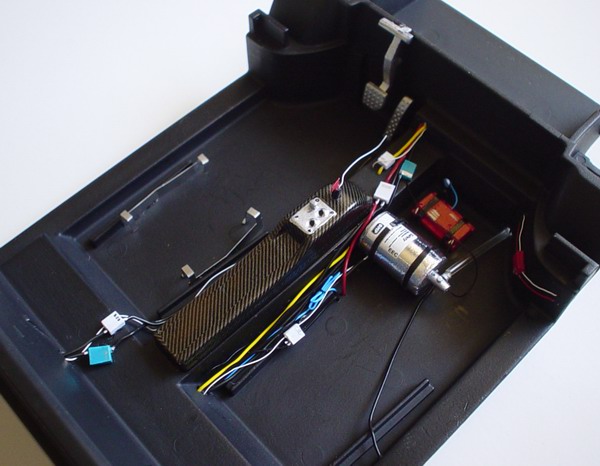 |
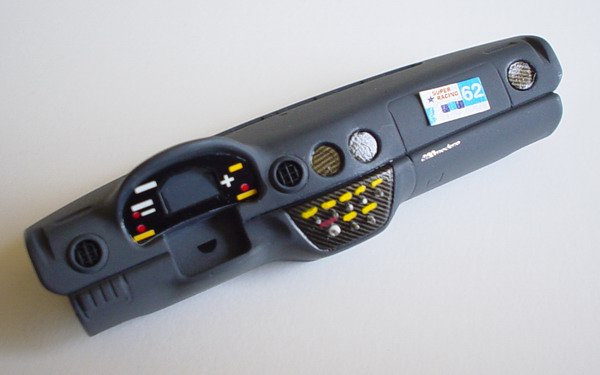
Everything you see on this picture except pedals and tub itself was scratch-built. I made switches, relays, and connectors from sheet styrene and wired them all with almost a feet of different thickness wires. I also applied C/F decals central tunnel, added onboard fire extinguisher system, some piping, seat mounts and some other minor stuff. |
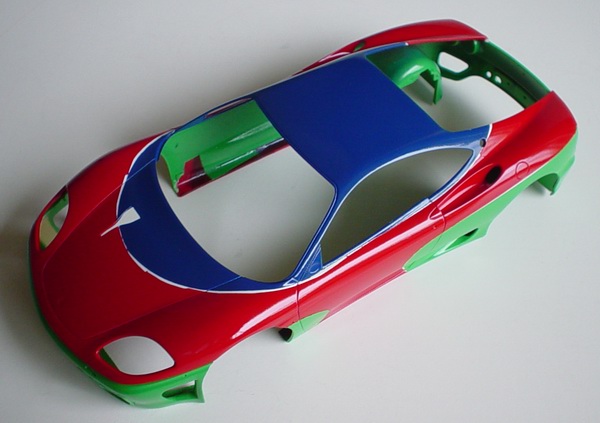 |
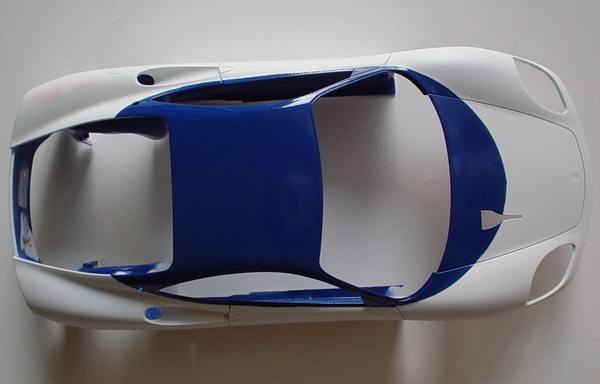
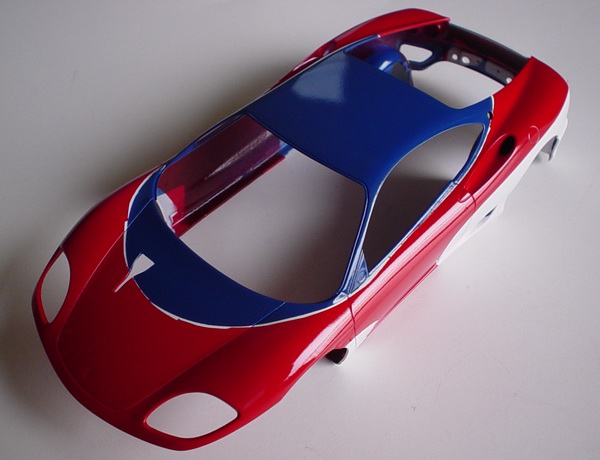
After several coats of custom mixed green lacquer, I let the paint cure for about 10 minutes, and removed all the masks - finally the body was painted! I also painted the front bumper and temporarily attached it to the body with pieces of masking tape. |
 |
I painted door panels flat black and added wire-handles, painted the seat with mixture of flat and gloss red Tamiya acrylics, added C/F decal to the back, installed the harness and applied the rest of the small decals everywhere. Then everything was assembled together. Done! |
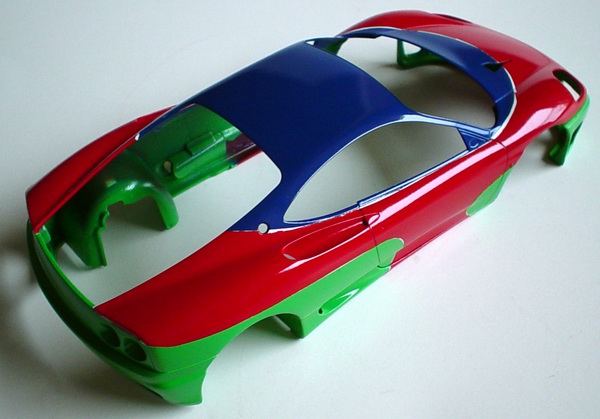 |
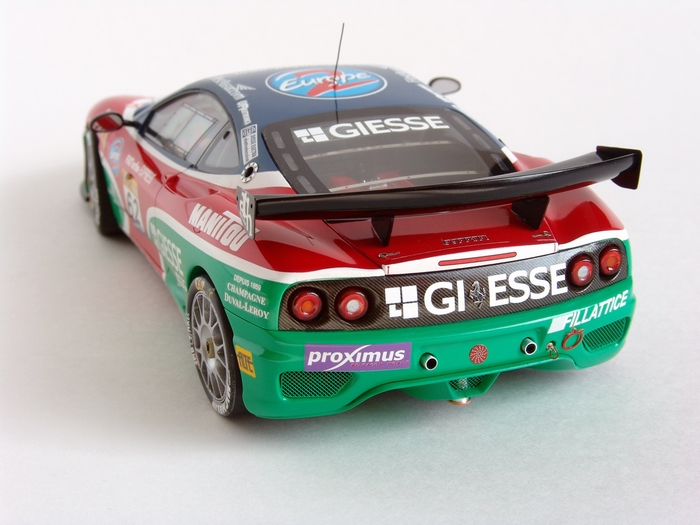
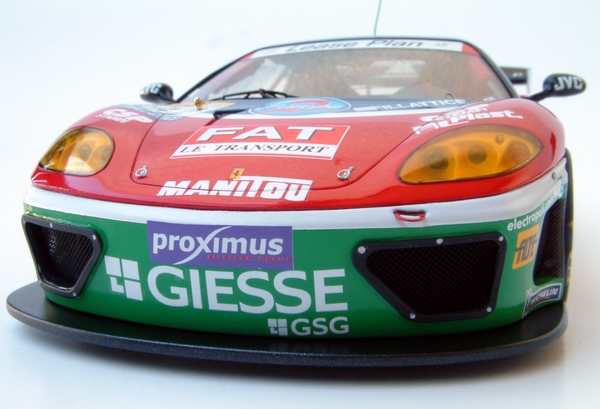
Note that rear wheel arches were also painted green. This is the way its done on the real car. Green color looks lighter on the pictures than it is in real life, but its still very close to original color. |
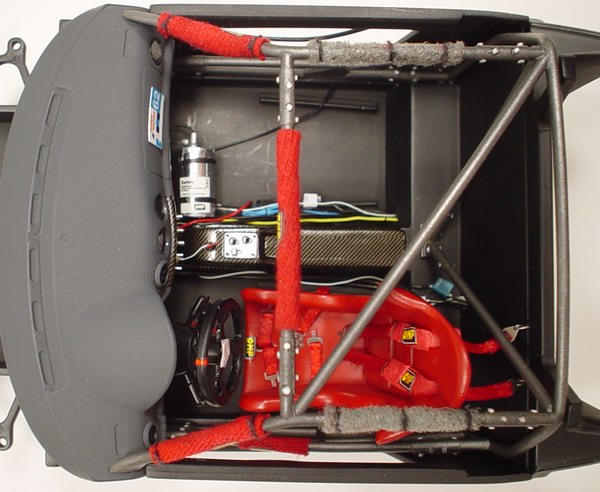 |
This interior was assembled from more than 300 parts, only 9 of which were kit parts and 10-12 were supplied by the transkit. Its a pity Renaissance does not provide more parts to make accurate conversion. If not all - roll cage and door panels would be a really nice addition. The finished interior looks really great, and very close to the original. |
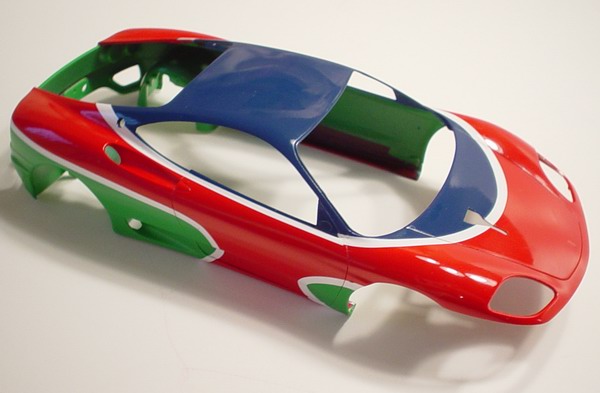 |
After all three colors dried completely, I polished the paint with 3M polishing compound, then washed the body shell with soapy water to remove polish residue. Color separation decals were applied to the body using plenty of MicroSol to help them to conform to Modena's curves. |
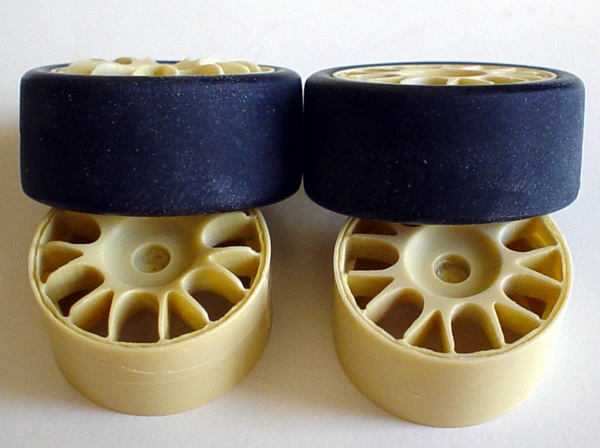 |
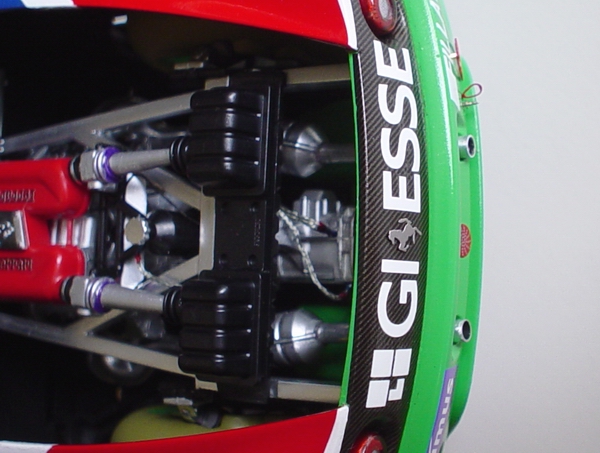
Now to the chassis. Wheel castings were not very good. Its a very complicated casting, and it had several mold lines, and required a lot of cleanup. Moreover, the shape of the rims was not entirely correct - rim spokes are flat on a real car, and they were cast curvy - I corrected this by sanding them off with the sanding stick. |
 |
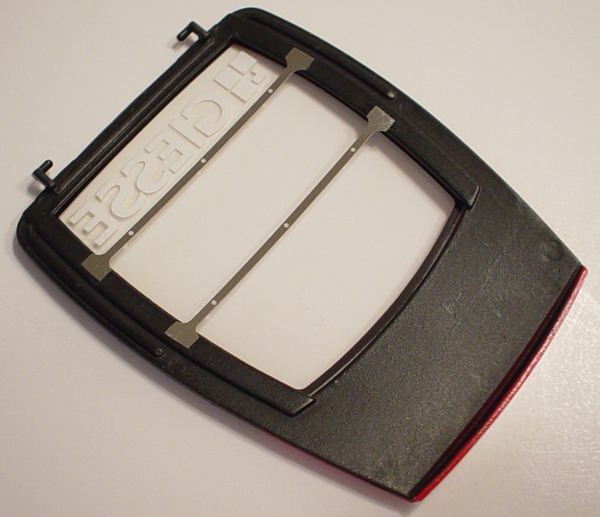
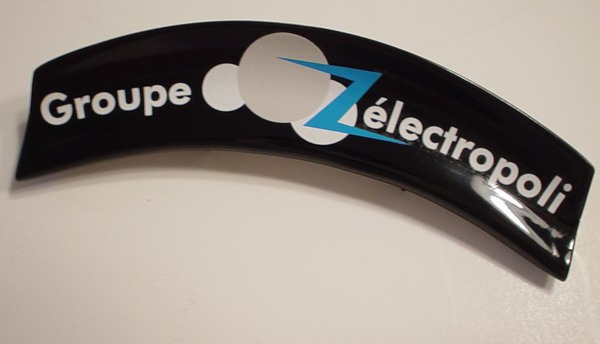
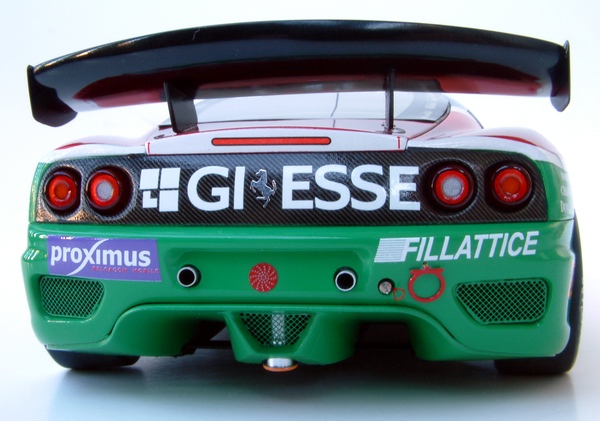
Rear end was treated to Scale Motor Sport (SMS) carbon fiber decal, again settled down with plenty of MicroSol and little help from hair dryer. The most complicated part was to make it stick inside taillight housings. GIESSE decal was applied on top and taillights attached to their places. |
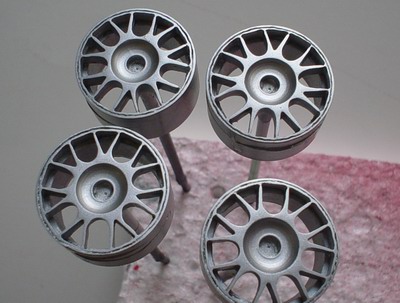 |
Rims were sprayed with grey primer and then with Testors aluminum metalizer. Metalizer was sprayed with Tamiya clear gloss, and while it was still wet, with another coat of metalizer. This way, metalizer will have its natural aluminum shine, but will not rub off when you handle the rims. |
 |
Other body parts were painted according to their color schemes: spoiler - gloss black, bumper - gloss green, front splitter - metallic black, rear hatch - Italian red with some black, and finally headlights - gloss chrome yellow. I also installed clear lenses inside the headlights. |
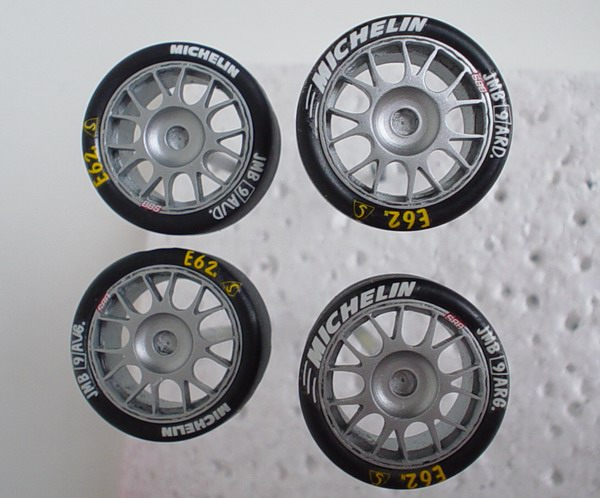 |
Tires were sanded, and cleaned with rubbing alcohol to remove shine. Then I applied all decals, and sprayed tires with a layer of dull coat. Tires were slightly sanded again to remove dull coat overspray. |
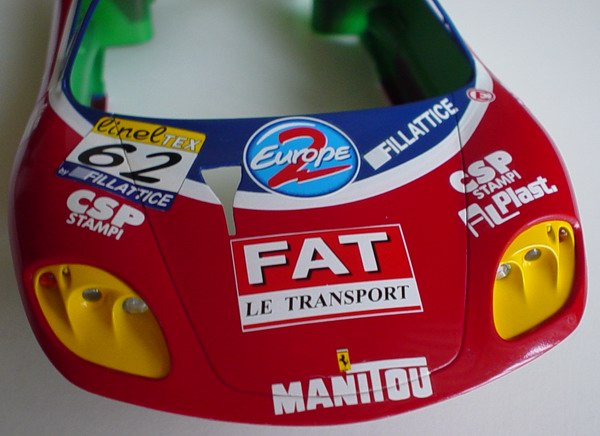 |
The headlights were glued to the body, and I continued with decaling the hood. Some decals are applied over the panel lines, so I slit them with Xacto after they dried, and applied some setting solution to the edges. Warm air from hair dryer helped them to settle down into the panel lines. |
 |
Chassis frame was slightly modified to accommodate different front bumper. Front lip was removed, but I left the area where radiators will go later. |
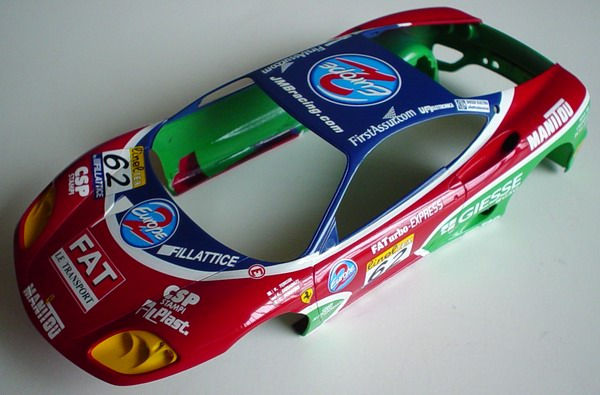 |
The rest of the body was decaled according to the instruction scheme and some real-car pictures. Renaissance decals are excellent - very thin, but never bleed through. Color registration is first class, and they are very responsive to the setting solution. Pleasure to work with! |
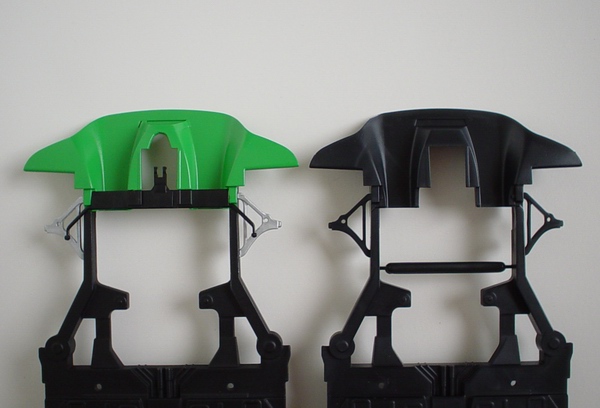 |
Rear end of the chassis frame was also slightly modified. I cut a hole for a rear jack, and installed a photo-etched mesh instead of molded mesh in part A22. Rear was also painted green to match the bumper. |
 |
Rear hatch was polished, then I masked the outside and sprayed some flat black on the inside. Two photo etched bars were also attached to the hatch at this point with superglue. |
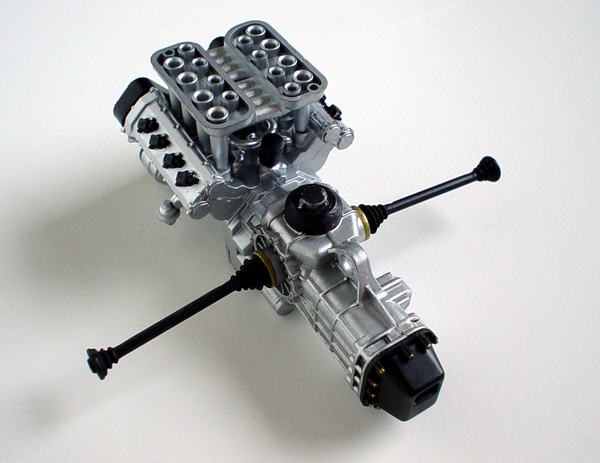 |
The engine block was assembled according to the instructions without any major modifications. I drilled several holes here and there for the wiring, but that was about it. |
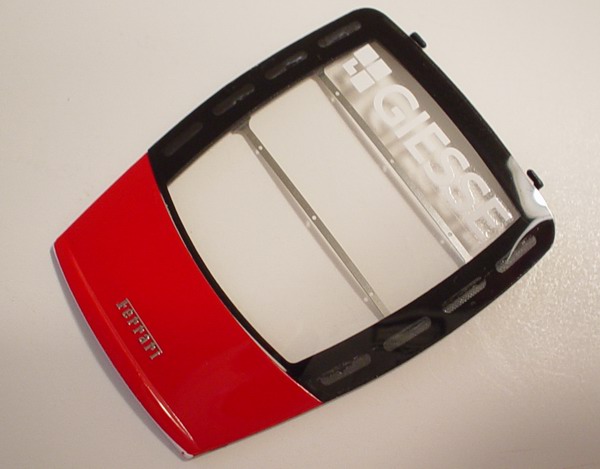 |
On the outside I added white stripe decal to the rear end, Tamiya Ferrari metal transfer, and finally thin clear acetate sheet, with dark areas imprinted on the sheet. I attached the window with some CA glue and topped it off with GIESSE decal. |
 |
Exhaust manifolds were cut and drilled to accept thicker exhaust pipes. Air boxes and air intake system was also modified. I scratch-built new air restrictors from spare sprue and parts of the original air intake pipes. |
 |
Rear spoiler was polished, waxed and sponsor decal was applied on top. Only after painting spoiled gloss black, I noticed that it is not entirely proportional - one side is slightly wider than the other - but its barely noticeable. |
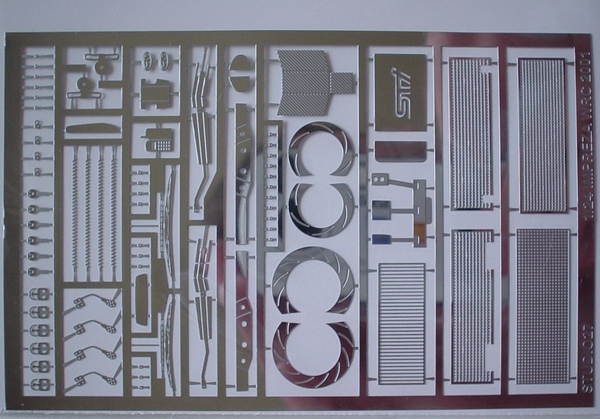 |
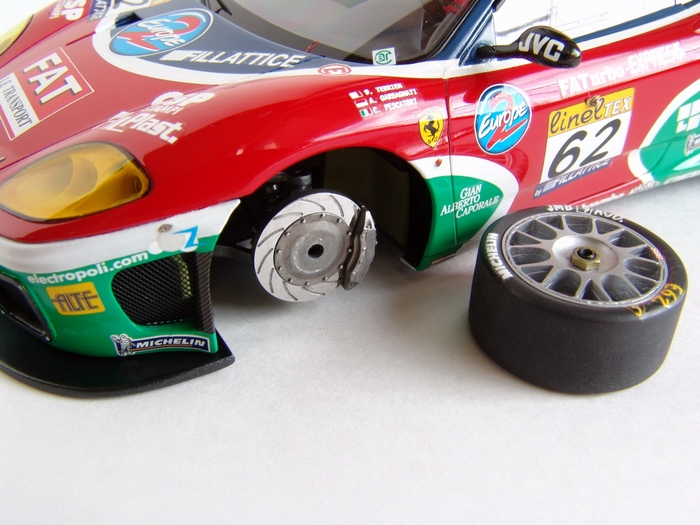
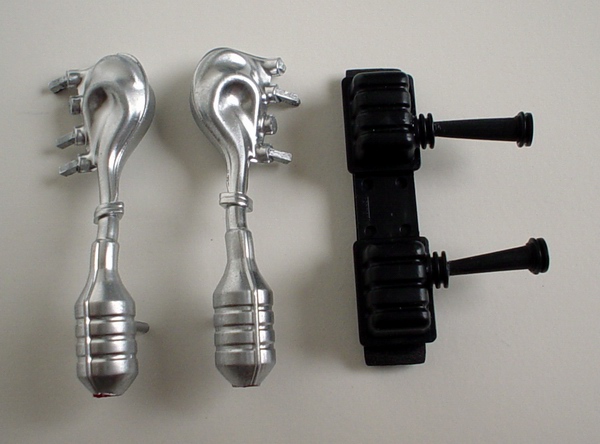
Studio 27 PE set for Tamiya Subaru WRC 2001 was used for the front brake rotors. Rotors from this kit were also used to represent brakes of the 360GT. They were very similar-looking to the ones on the pictures I had |
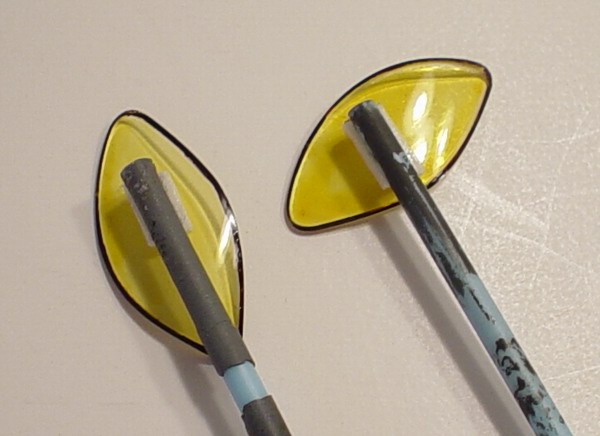 |
The headlight covers are tinted yellow on the real car, so naturally they were treated to several coats of Tamiya Clear Yellow (X-24). The edge of the covers was painted with black Sharpie marker to simulate rubber gaskets. |
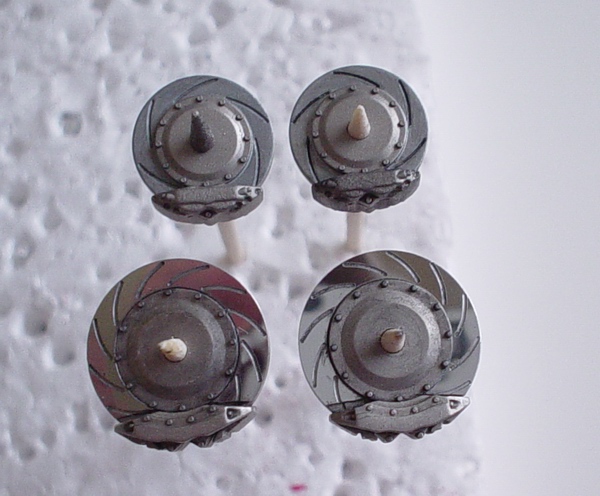 |
Both front and rear brakes were painted with Testors burnt metal metalizer and then I glued on the PE rotor faces. Rear rotors were painted aluminum metalizer and then I applied black wash to accent the details of the rotors and calipers. |
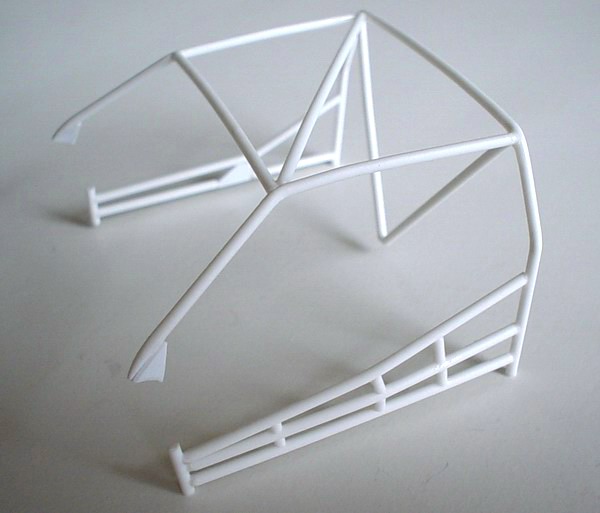 |
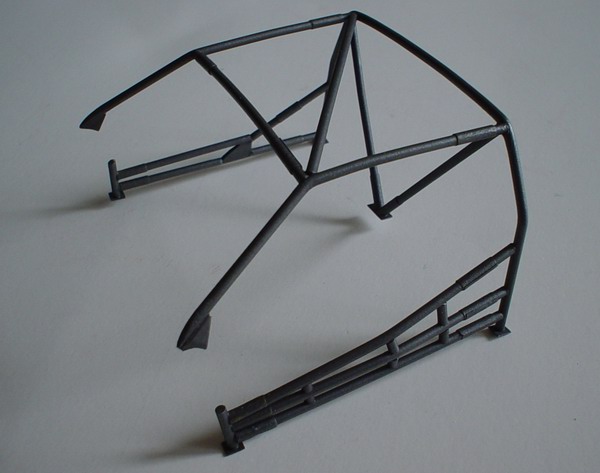
Then I started working on the interior. Since transkit includes only seat and fire extinguisher tank, the rest of the interior equipment had to be scratch-built. I started with the roll cage, which was constructed from 1/16" Evergreen styrene rod. Non-round plastic pieces were made from sheet styrene. |
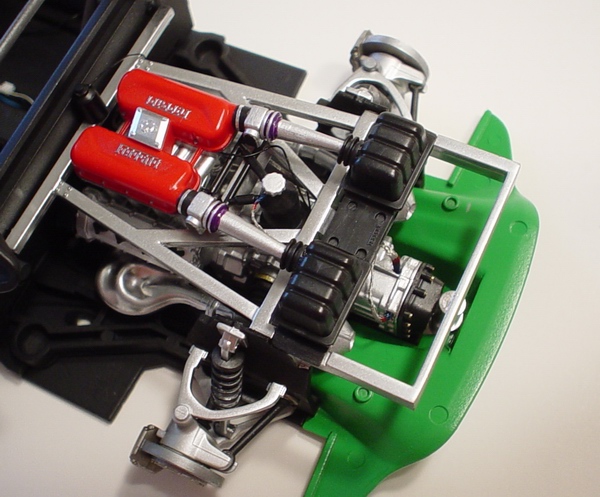 |
Engine and rear suspension were assembled and painted according to the instructions. Then I wired the engine with Detail Master wires and braided lines. Note air restrictors coming from the air boxes. |
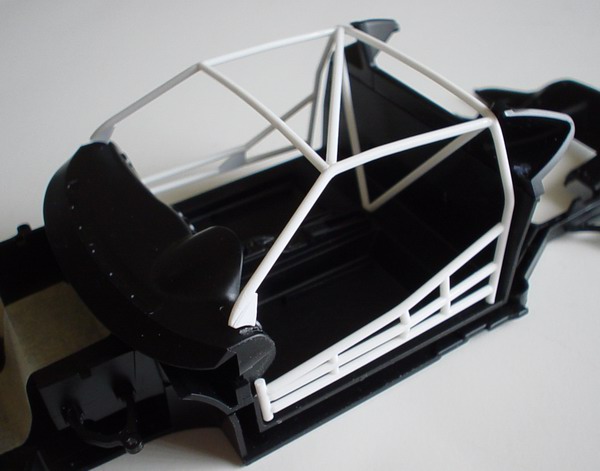 |
After a lot of measuring and cutting I finally had a roll cage that had a decent fit. I glued everything together with Tamiya liquid cement and I also temporarily glued the dashboard to ensure proper cage fit. |
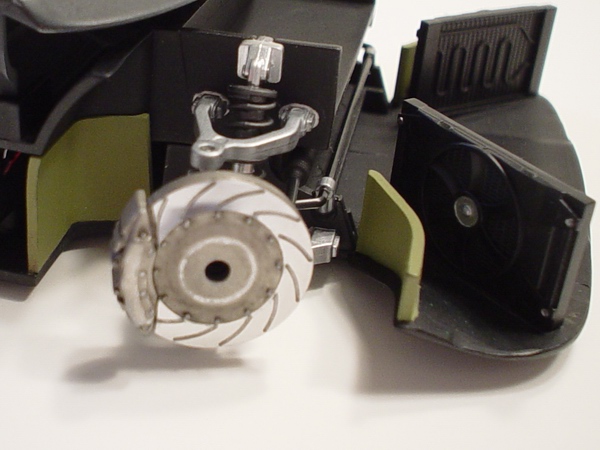 |
Front suspension was also painted and assembled according to the instructions, except for the brakes. Construction of the rotors is different in Modena and Subaru kits, and it took some time before I figured how to attach them without sacrificing the functionality. |
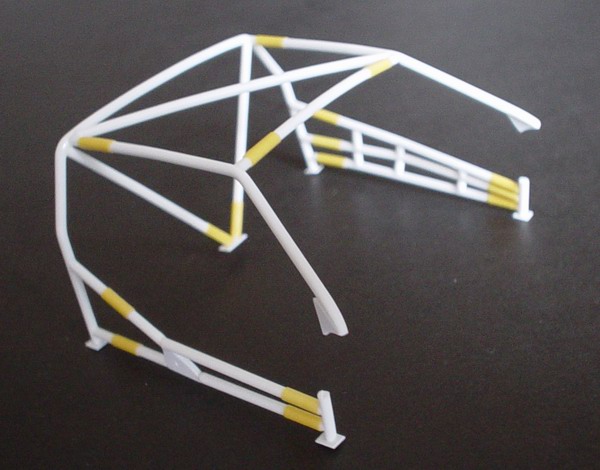 |
Since this was my first custom made roll cage, I decided to make it as close to the original as possible. You can clearly see some reinforcements on the real cage, so I made them from thin stripes of Tamiya masking tape and wrapped around the cage bars. |
 |
Finally, interior was installed to the chassis plate, and all minor details were added. Now everything was ready for the body shell. |
 |
After burnishing the tape really good, I sprayed a coat of gray primer, and then several coats of Testors Titanium buffing metalizer. After about 30 minutes of drying time, metalizer was lightly buffed to bring out its metallic shine. |
 |
Body was installed on the chassis, and I started adding all the little details. Exhaust pipes were cut from the thin aluminum tubing and installed directly to the exhaust manifolds. I also thinned the tips and painted insides flat black. |
 |
To imitate the rivets on the roll cage reinforcements, I sliced some very thin square and round styrene rods. Small round bits look exactly like rivet heads, and square bits like nuts. I would suggest using hex-shaped rod for nuts though, I just was too lazy to go to the hobby shop to get it! |
 |
Front bumper and front splitter were glued to the body, and minor details, such as hooks, hood pins, mirrors, etc were added. |
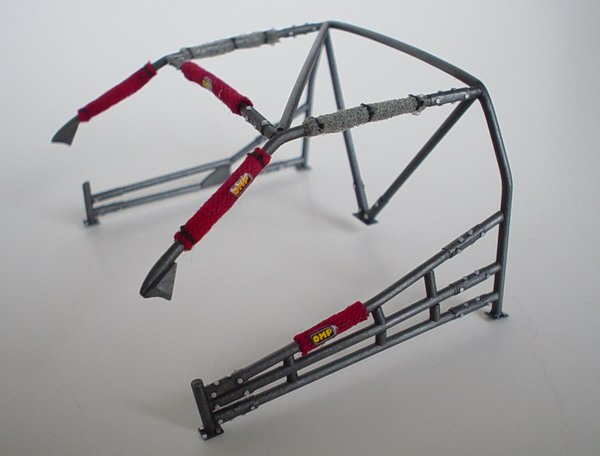 |
I glued four rivet heads and four nuts per reinforcement and painted them silver with a fine detail brush. Padding was made from an old t-shirt painted with red felt marker, and some gray foam and tied down to the roll cage with a sewing thread. Decals were removed from their paper backing and glued to the cloth padding with white glue. |
 |
At the rear I installed the wing, jack, jack air port, hood pins, mesh, and other details and decals - and finally - Cavallino Rampante - Tamiya metal transfer. |
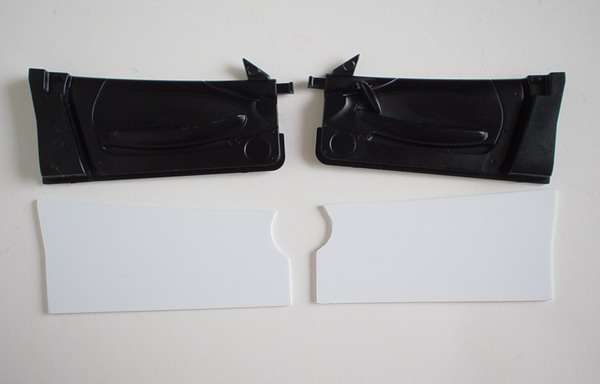 |
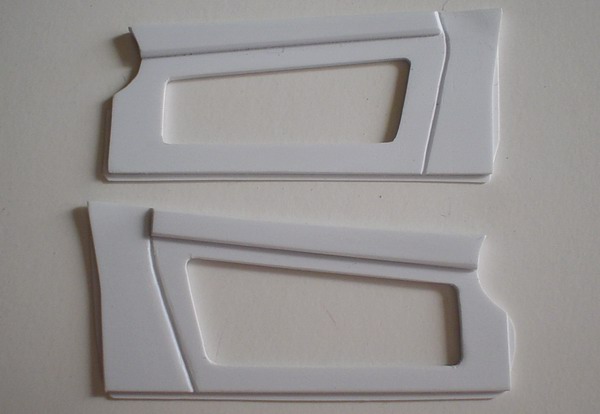
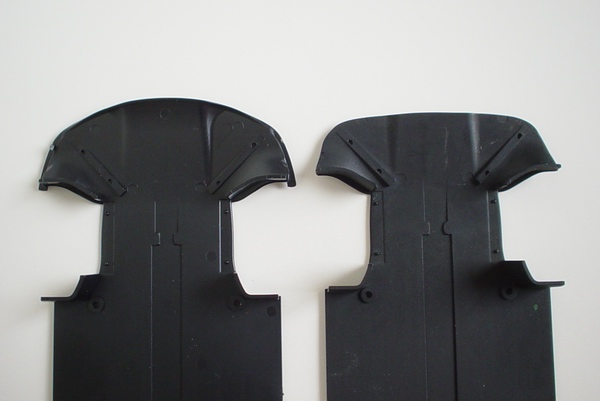
On to the door panels. I thought I could modify kits' door panels, but after taking a closer look I decided to make new ones. It seemed like less work than trying to modify kit parts. I've traced basic contours to the sheet of .010" Evergreen styrene, cut them out, and smoothed the edges with a sanding stick. |
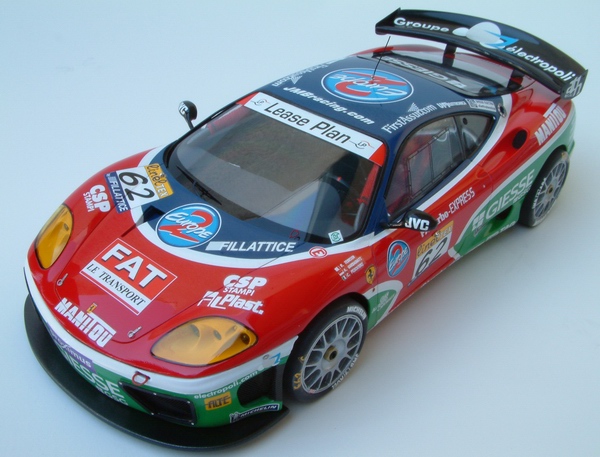 |
Finally I added sliding windows to the sides, antenna to the top, Dzus fasteners to the front bumper, gas filler surrounds, and lightly waxed entire model. Then I took some pictures and sealed it in the display case. |
Copyright 2003, 2005 Alex Kustov. No copying or reproduction in any shape or form without written permission of the author.