F e r r a r i F50
|
|
|
|
|
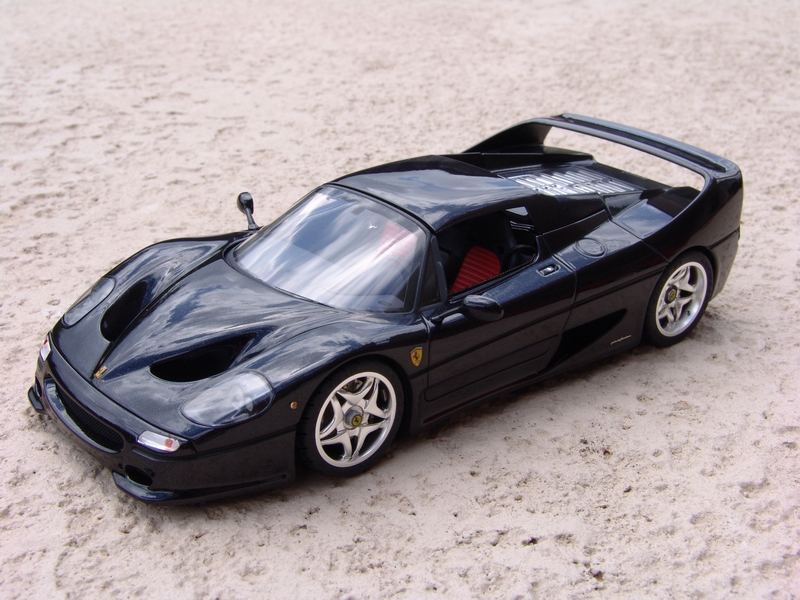
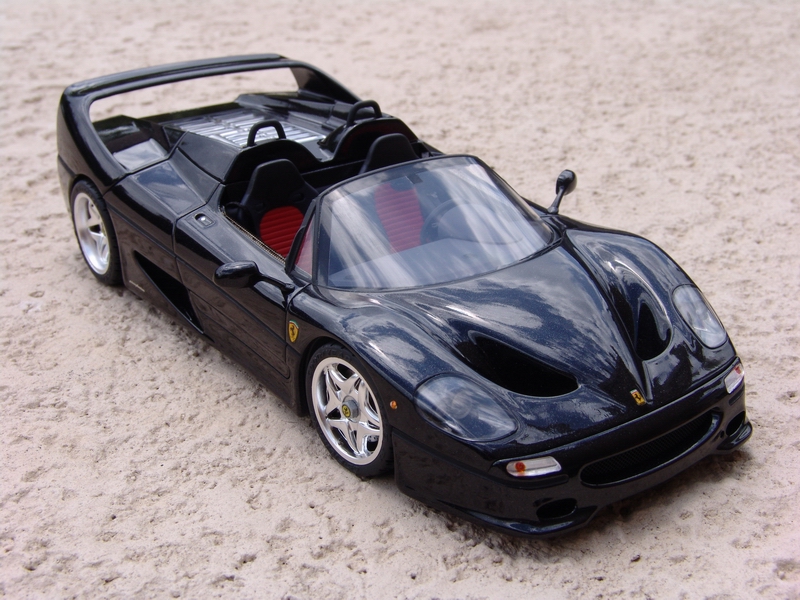
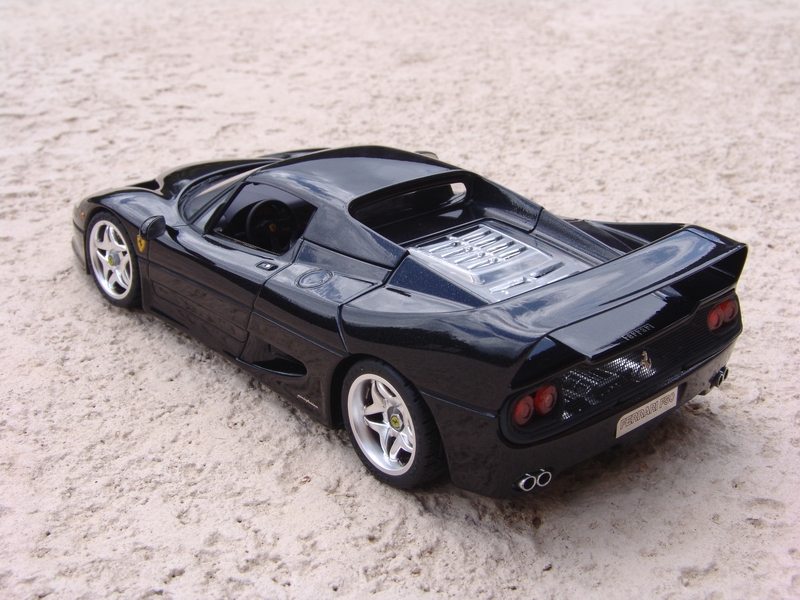
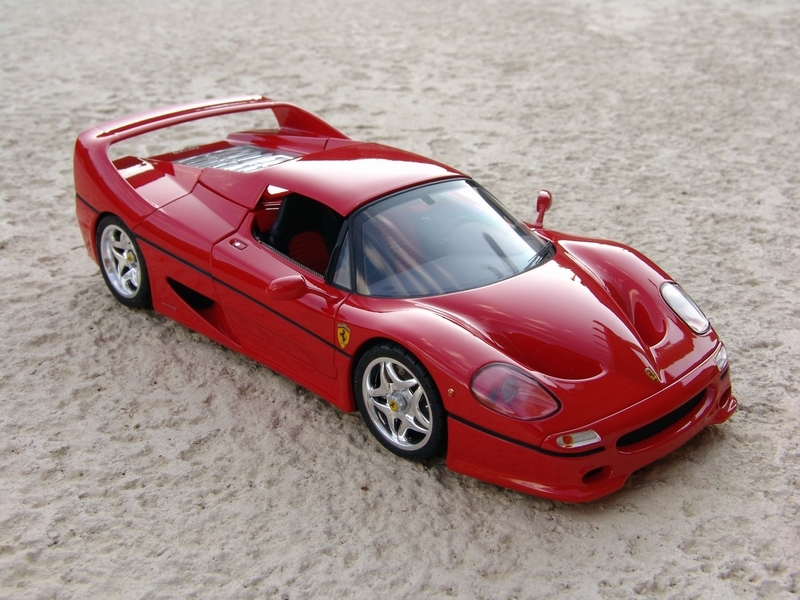
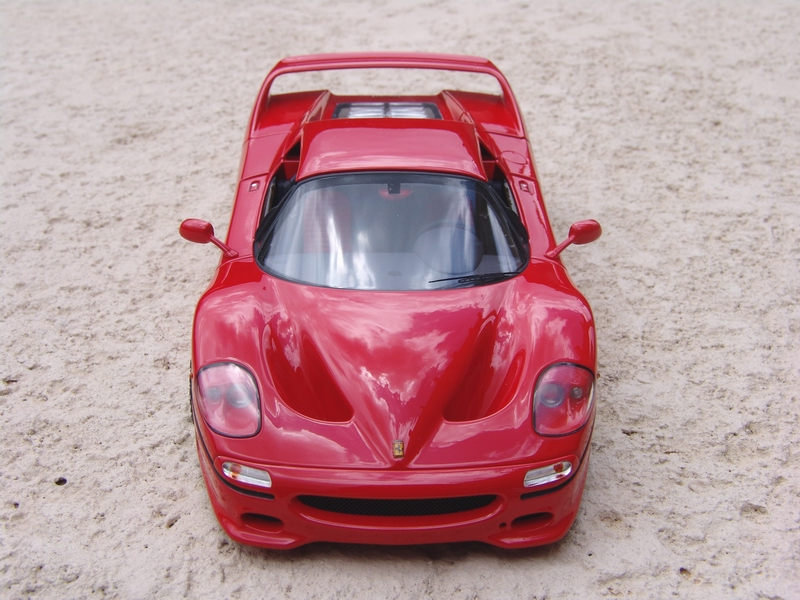
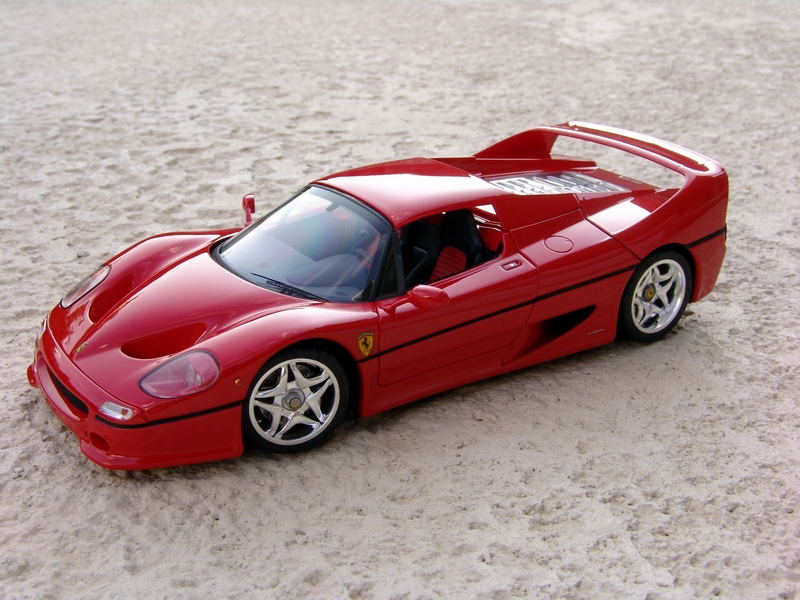
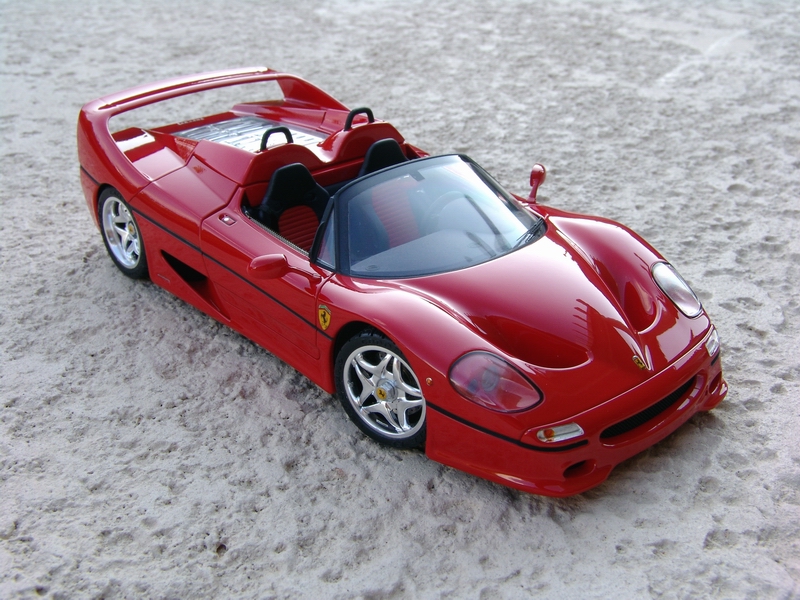
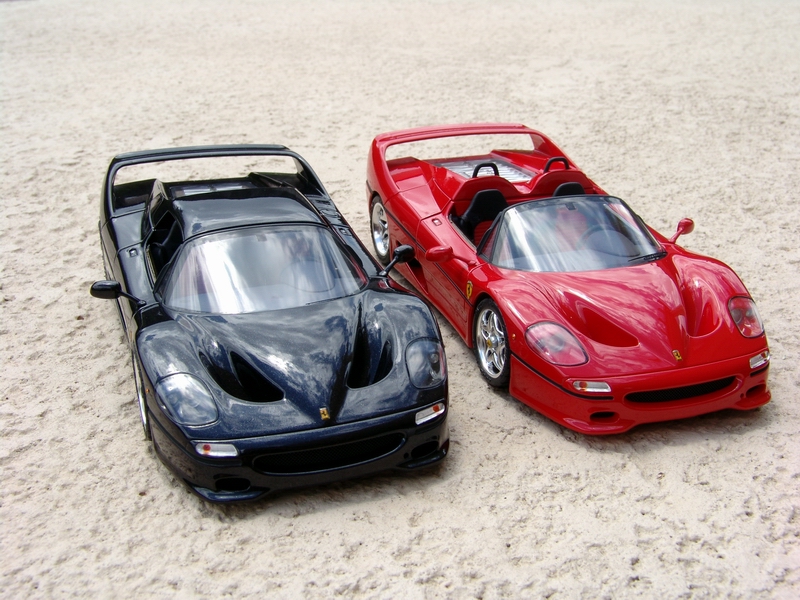
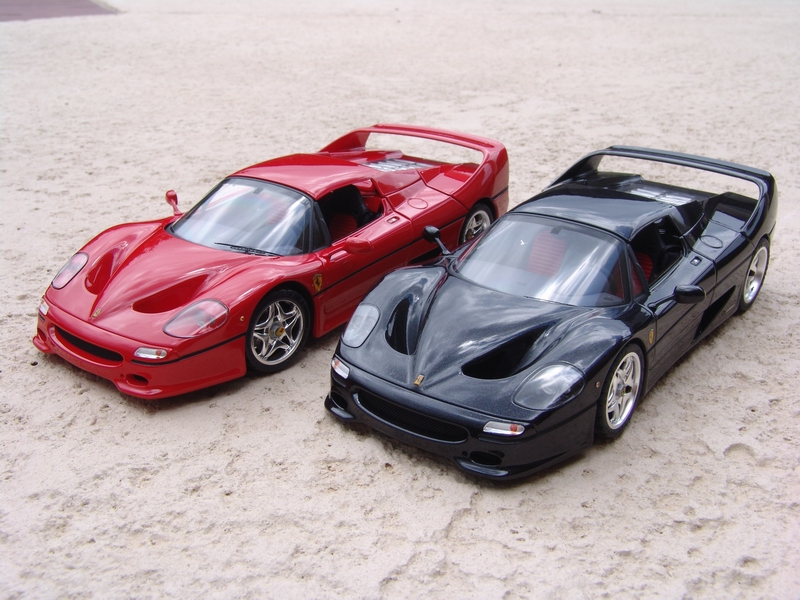
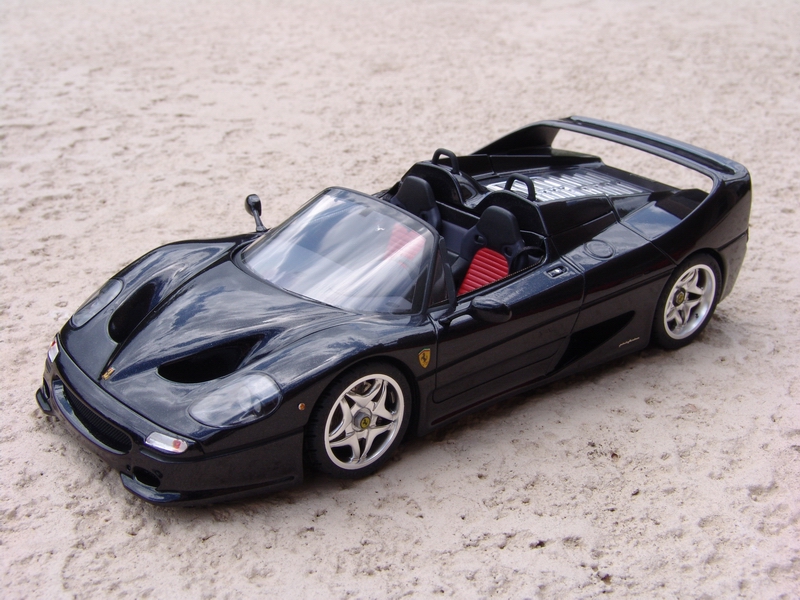
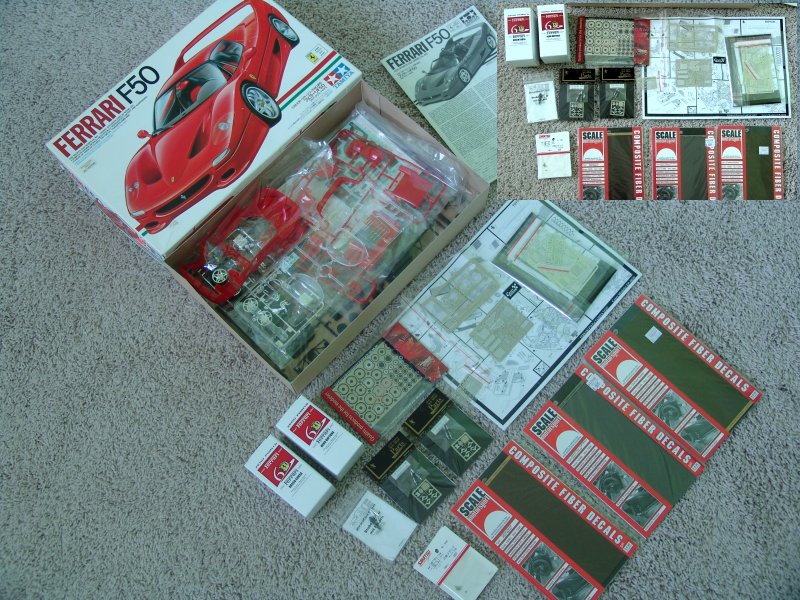
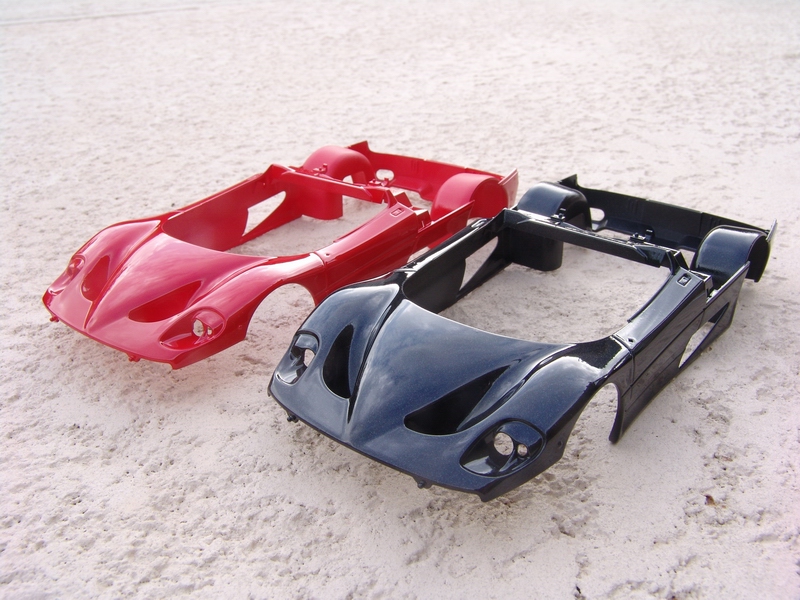
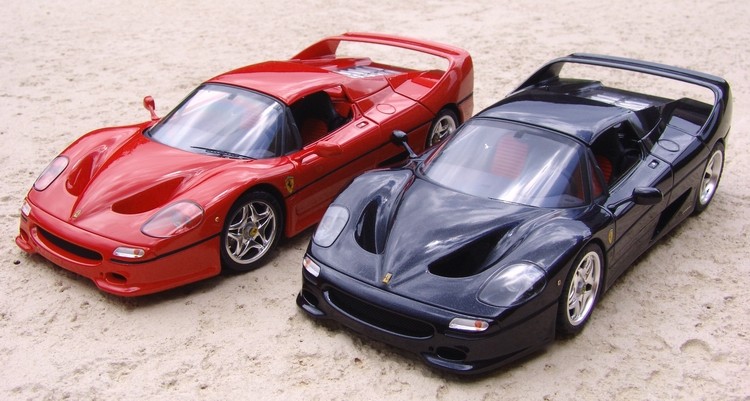
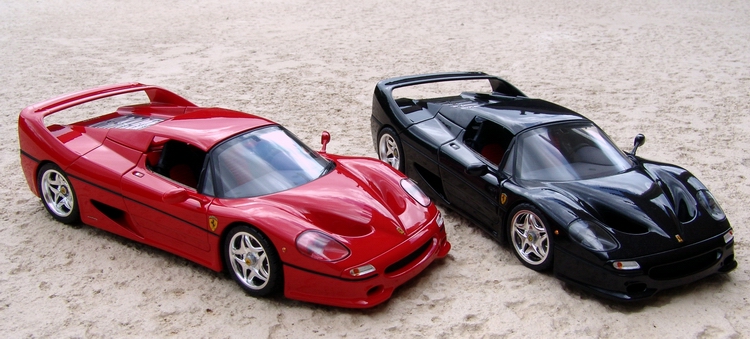
Kit: 1/24 Tamiya Ferrari F50 Pros: Correct body shape, very nice wheels (even though chrome plating is too bright) and tires, great interior detail, outstanding engine detail, traditional Tamiya mould quality and packaging. Good engraving on all parts, easy to follow instructions and nice, thin decals. Cons: Some fit problems, especially with the roll-bar cover/removable roof panel and engine lid. Not entirely correct color guide (no indication of where to apply C/F), absolutely useless (wrong color and weave) and incomplete C/F decals. Some heavy mold lines on the body (inside the wing) and engine lid underside, not very realistic-looking headlight assemblies. Poor engineering of side air intakes which leaves panel lines that are absent on the real car. Verdict: Despite its drawbacks it is still the best kit of the mighty F50 in 1/24 scale on the market. Great engine detail makes it number one choice for super detailed project. I couldn't decide on red or black, so I have built both! I have used Crazy Modeler P/E transkit, Acu-STion shock sets, and few other aftermarket goodies, but even built box-stock, it would look amazingly real and make great shelf model. |
|
|
|
|
|
|
|
|
|
|
|
Buildup
|
|
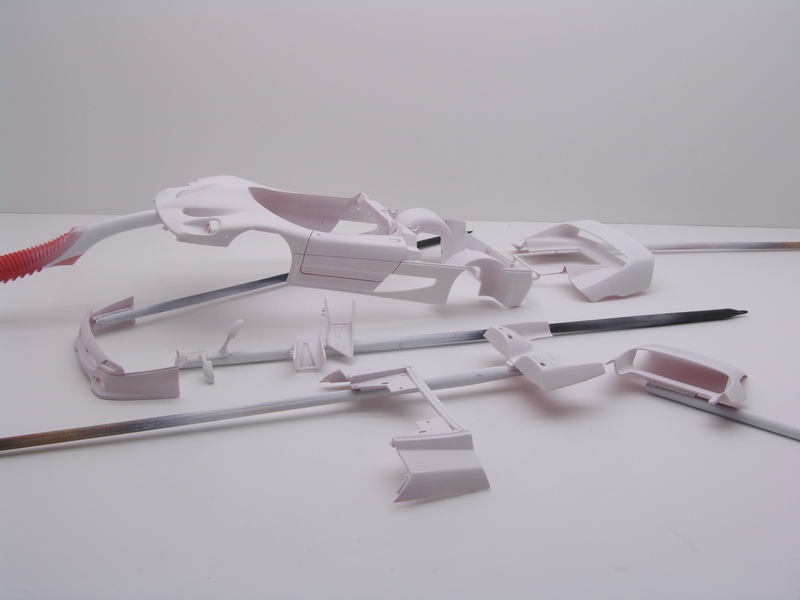
Here is what I started with - Tamiya kit, Crazy Modeler photoetched detail set, Acu-STion shock sets, Scale Production shock set, Scale MotorSport composite decals of different kinds (Kevlar and Carbon Fiber), Sakatsu fittings, and excellent Zero Paints lacquers in Rosso Corsa and Nero Daytona. |
|
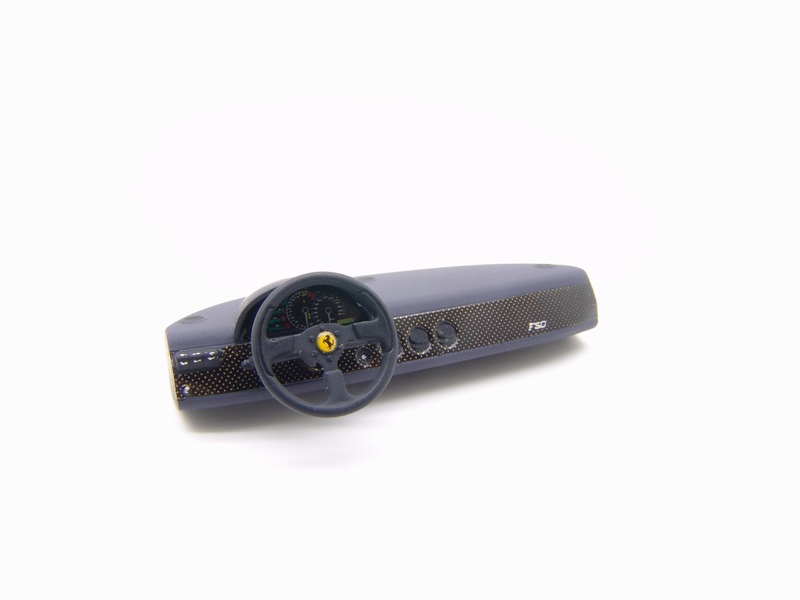
Dashboard C/F decal is quite complex, so I photocopied Tamiya decal sheet, cut the dashboard decal and used it as a template to make my own from SMS decal sheet. I used various size hole punches to cut out the holes for air vents and instruments. |
|
|
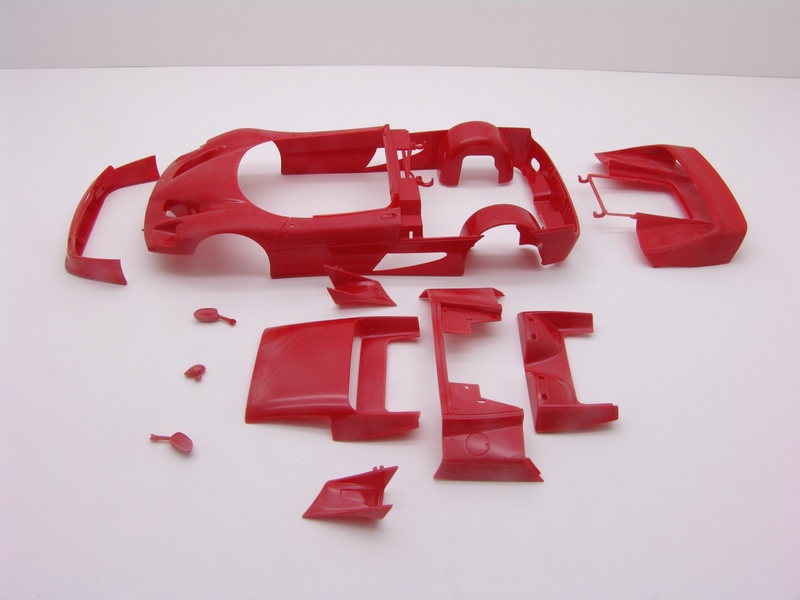
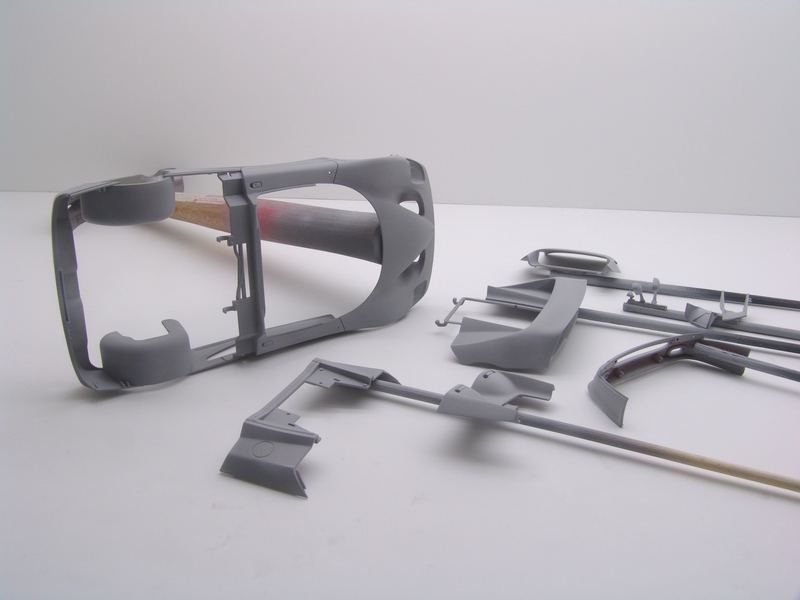
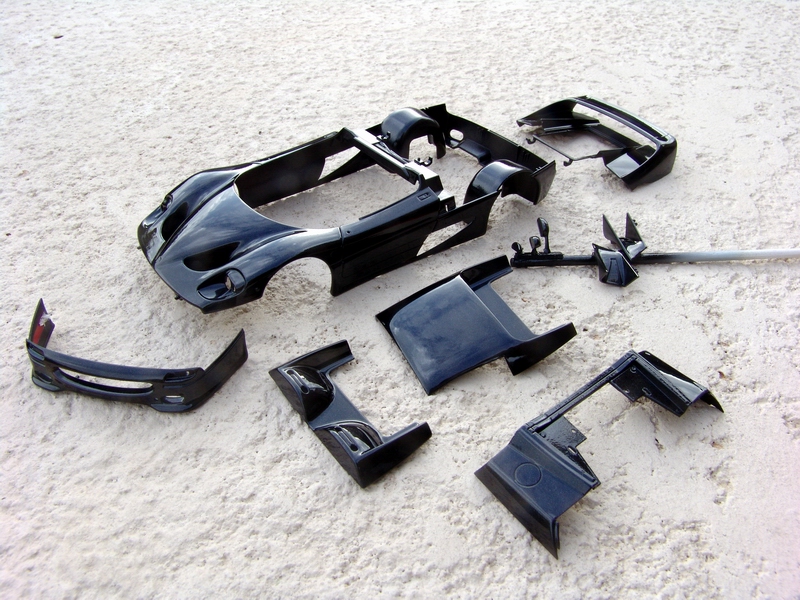
Since I was building two identical models I will be showing progress of just one, with some pictures of the other. All parts that had to be painted body color were removed from sprues, cleaned and lightly sanded. |
|
When C/F decal was completely dry, I clear-coated it with Future. Then masked it off and painted the rest of the dashboard with a mix of Tamiya gray and purple flat acrylic paints to match the color of the Alcantara on the real dashboard. Steering column, instrument decal, and F50 metal transfer completed dash assembly. |
|
|
Before continuing with priming and painting I test fitted all major body panels to check the fit and panel gaps. I also re-scribed most panel lines to deepen them a bit (Tamiya panel lines were too faint for my taste). |
|
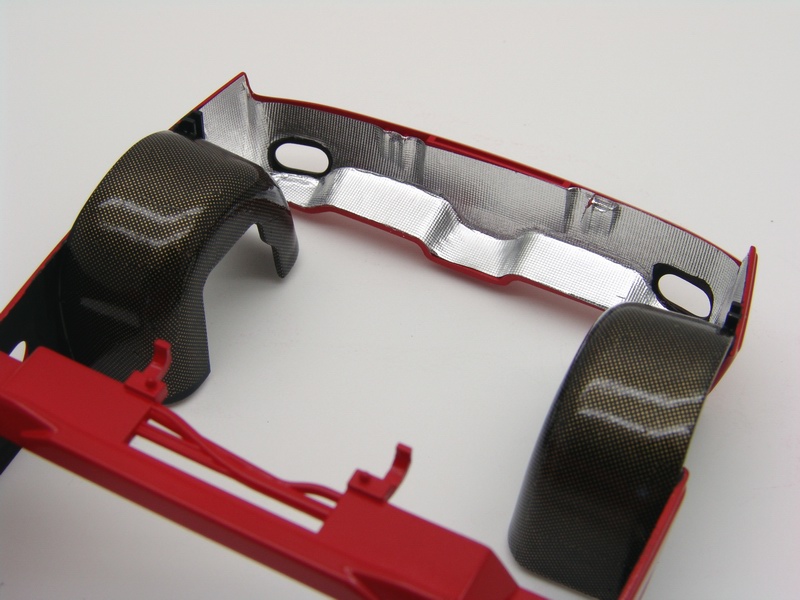
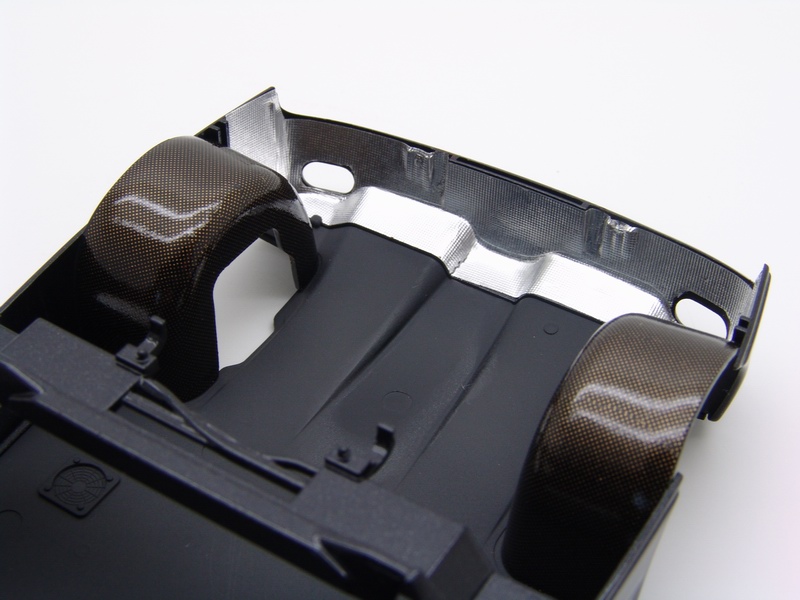
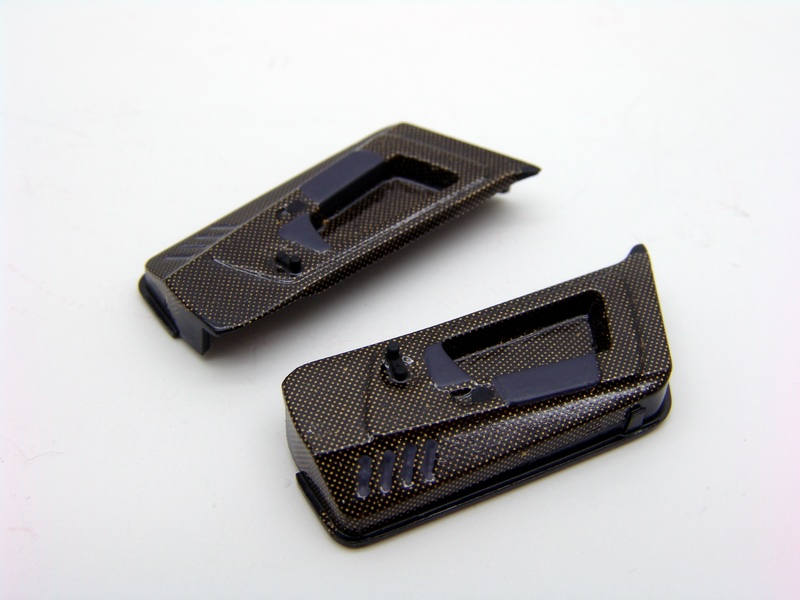
Rear fender wells were decaled with SMS Carbon Kevlar (worst C/F decals I have ever used - way too brittle), and then clear-coated with Future. Heat shielding was simulated with excellent Model Factory Hiro self-adhesive textured foil. |
|
|
Body panels that were to be painted Rosso Corsa were washed, mounted on bamboo skewers, and primed in Tamiya white fine primer. after close inspection, I wet sanded few small flaws, and re-primed with another coat of white primer. |
|
Then I did the same with the black car. Building two identical models at the same time really does save some time. |
|
|
Nero Daytona body panels were washed, mounted on bamboo skewers, and primed in Tamiya Grey fine primer. |
|
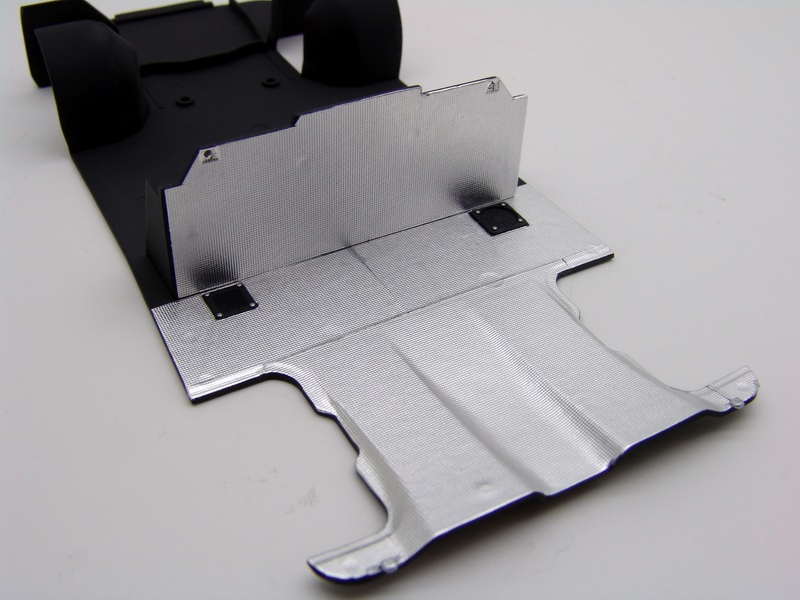
Engine bay and firewall were also covered with MFH heat shielding, |
|
|
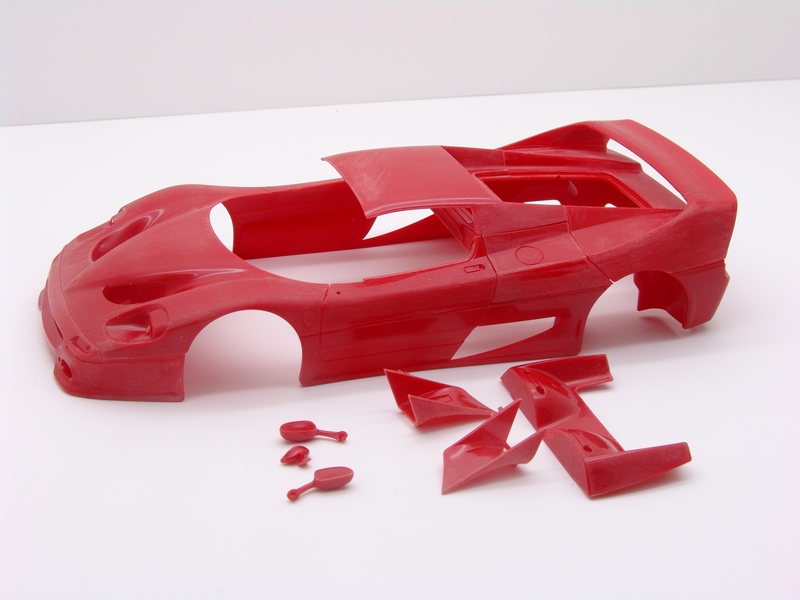
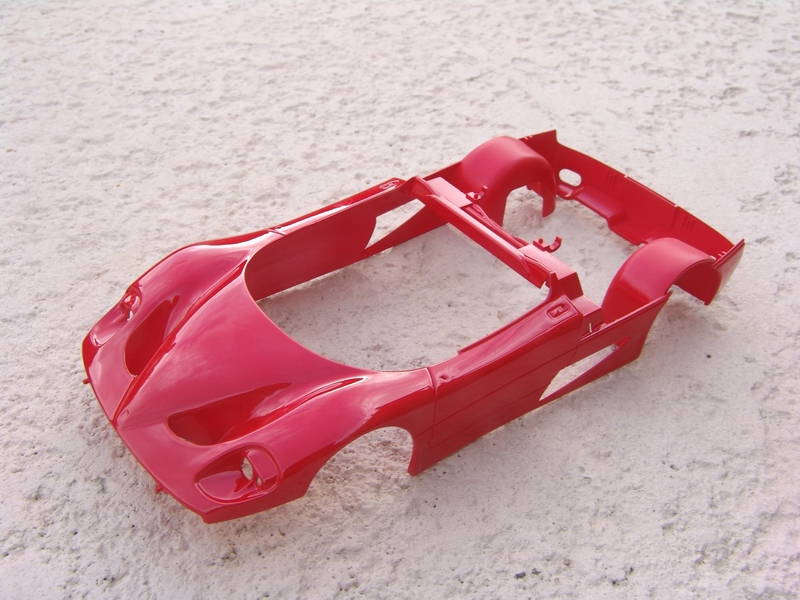
Body and all panels for the red car were airbrushed with Zero Rossa Corsa, and then clear-coated with Zero's 2-pack clearcoat lacquer, since base paint was flat. Here is a shot of the body after clear (not polished yet). |
|
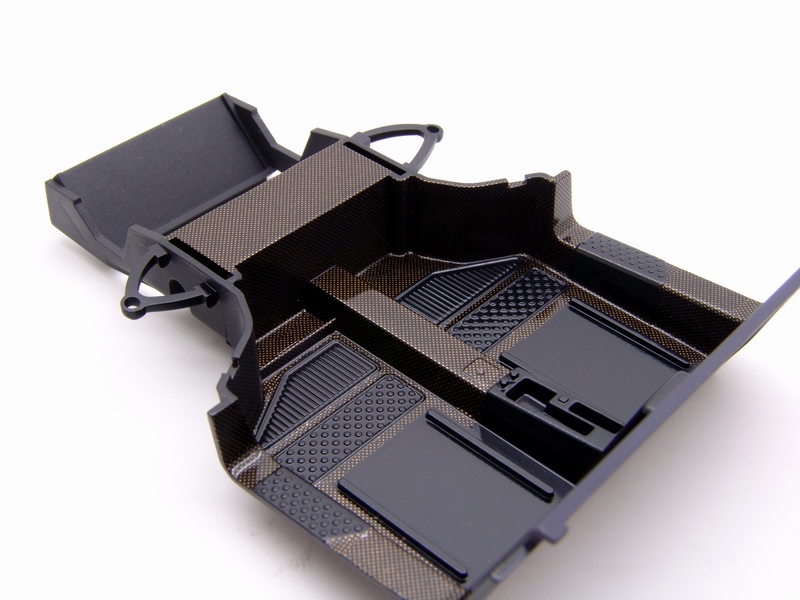
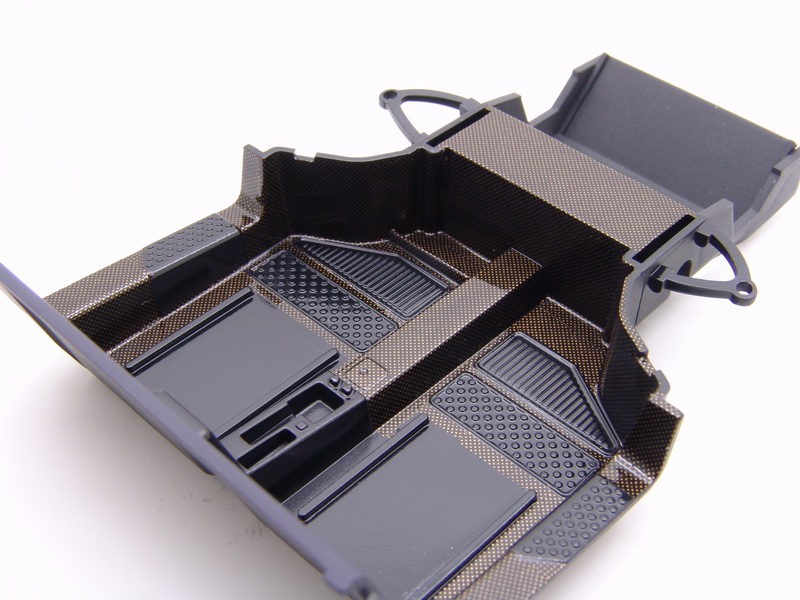
Interior tub was covered with SMS Carbon Kevlar, strip-by-strip, piece-by piece. Brittle decals didn't help either! After about 3 hours of applying decals I had completed one interior! After decals have dried for a few hours, I clear-coated them with Future shot through the airbrush at a low pressure. |
|
|
Here is a picture of red body and all panels after clear-coating and light polishing with 3M compound. Zero paints are great! Very easy to apply and color is spot-on! |
|
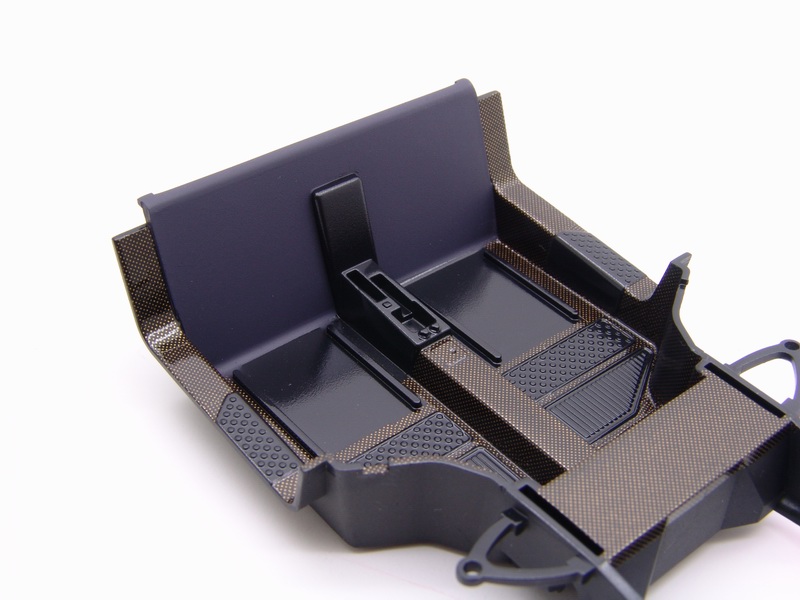
Another view of the completed interior tub. I knew most of this work will be hidden on a completed model, but I just wanted it to be as close to the original as possible. |
|
|
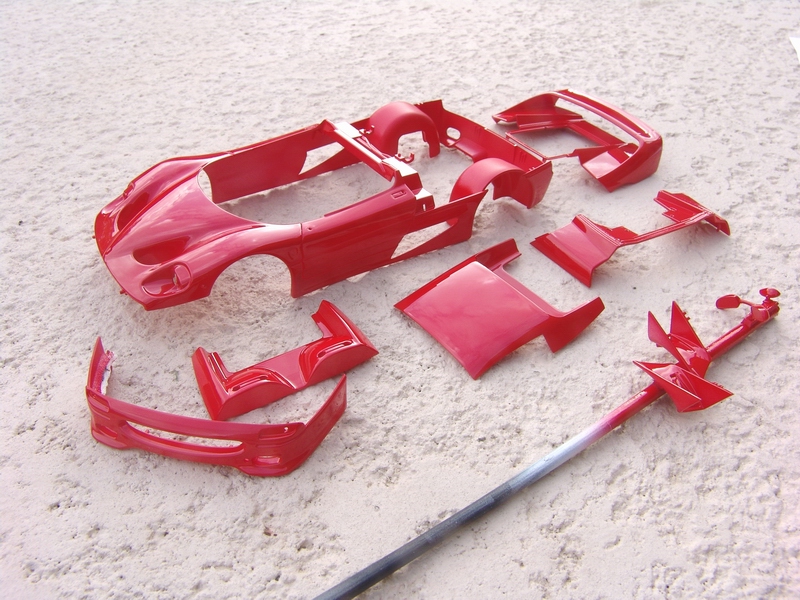
Both red and black bodies after clear-coating, ready for polishing. |
|
Rear interior wall was carefully masked with Tamiya masking tape and sprayed with the same mix of grey and purple acrylics that I have used on the dashboard. |
|
|
I repeated the process with all black parts. Nero Daytona turned out to be very translucent color (unusual for metallic), and I had to airbrush 5 coats of the paint to achieve complete coverage. |
|
Door panels were also decaled with SMS Carbon Kevlar (What a pain to apply these brittle decals to such curved surface!), clear-coated with Future (using wide brush) and detail painted. |
|
|
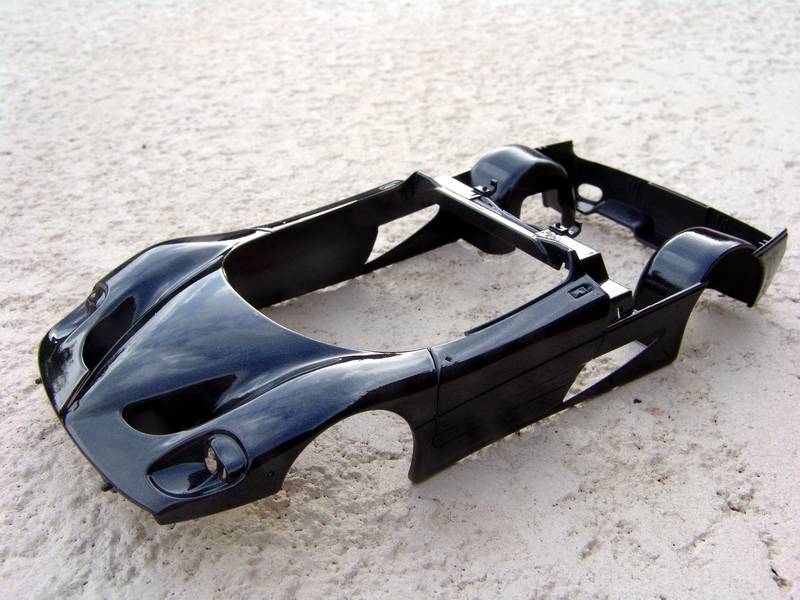
Here is a picture of black body and all panels after clear-coating and light polishing with 3M compound. Zero's 2-pack clearcoat requires very little polishing and dries rock-hard in just 24 hours. |
|
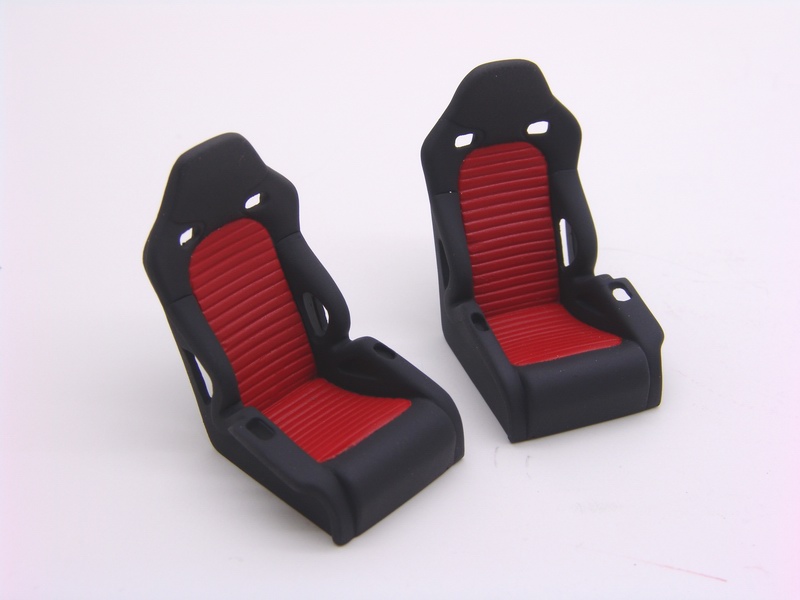
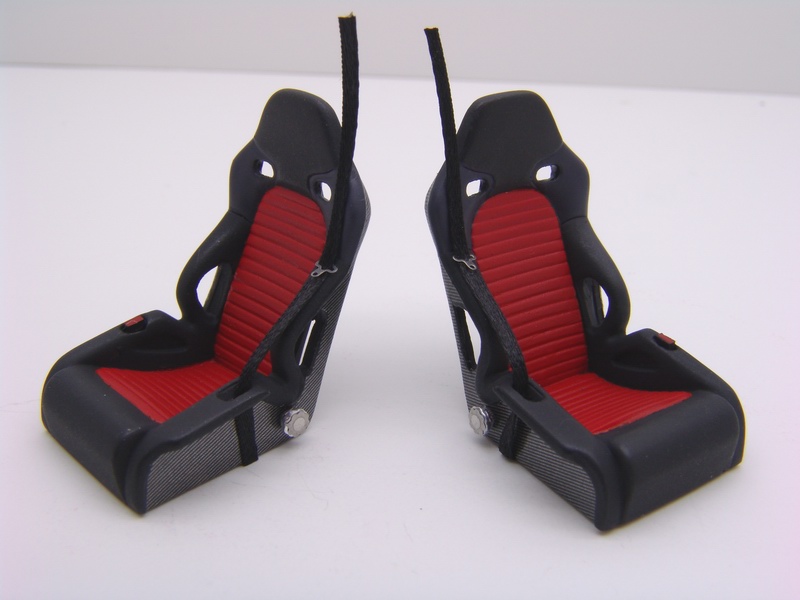
Next were the seats. Even though the seats are not bad in the kit, they require some modifications to look correct. First of all, I have opened up all holes for the harnesses, and drilled out side bolsters. Then I also drilled out an opening for the seatbelt retainers and putties the flaws. |
|
|
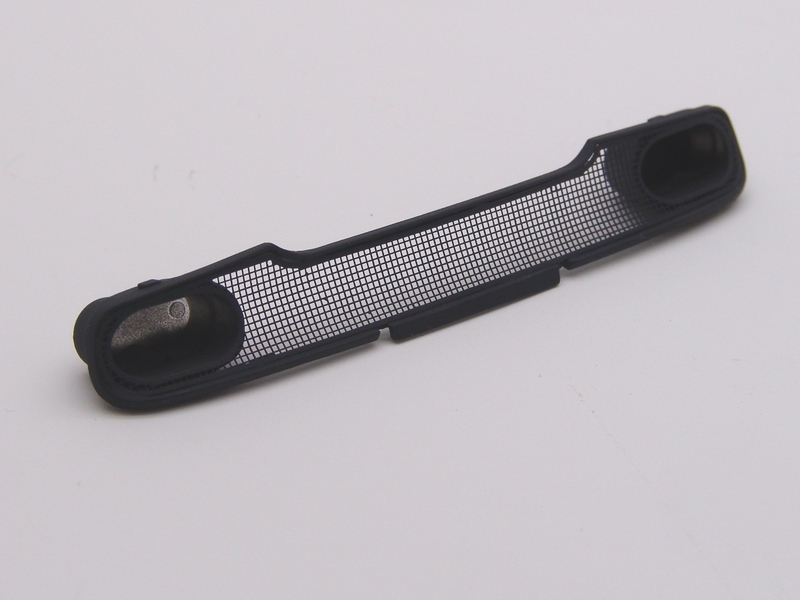
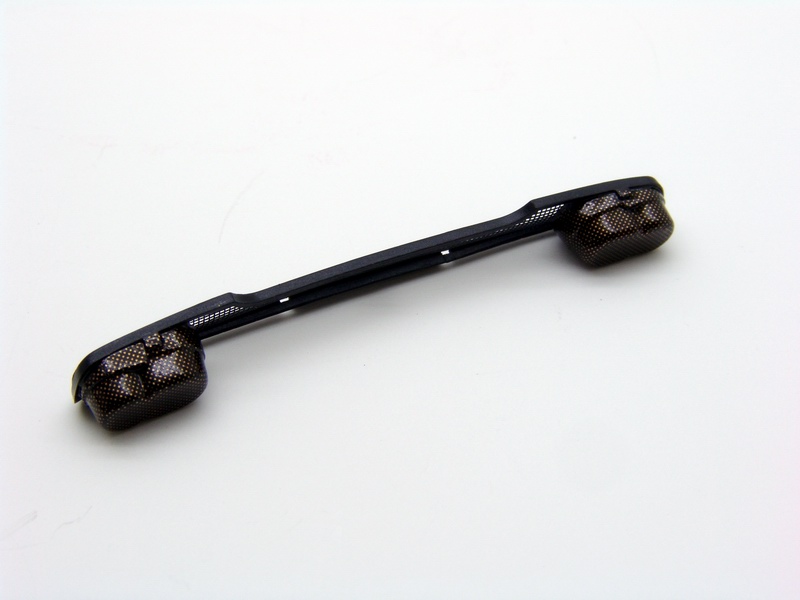
Before continuing with the build, I wanted to make sure I do one thing right, otherwise I might as well stop building it....rear mesh grille! Clear plastic is extremely brittle, so I proceeded slowly. After about an hour with a fret saw I had cut the plastic from the middle... |
|
Seats were primed with white primer, painted semi-flat red, then masked and painted semi-flat black. |
|
|
...and after another hour or so, working very carefully with sharp Exacto blade, needle files, and sanding sticks I had cleaned the frame for the mesh install. And after all this torture, I had to do it again for the second model! |
|
Seat backs were decaled with C/F, side inserts were painted with grey/purple mix to simulate Alcantara inserts of the real sets. Seatbelts made from thin ribbon with CM photoetched hardware were installed next, followed by scratchbuilt retainers with red release buttons and scratchbuilt seat adjustment knobs with CM P/E faces. |
|
|
Grille mesh from Crazy Modeler (CM) photoetched set was carefully cleaned and bent to fit the frame. I had to bend it using another plastic grille from another kit to make sure the curve is right. Otherwise I would just break the frame. |
|
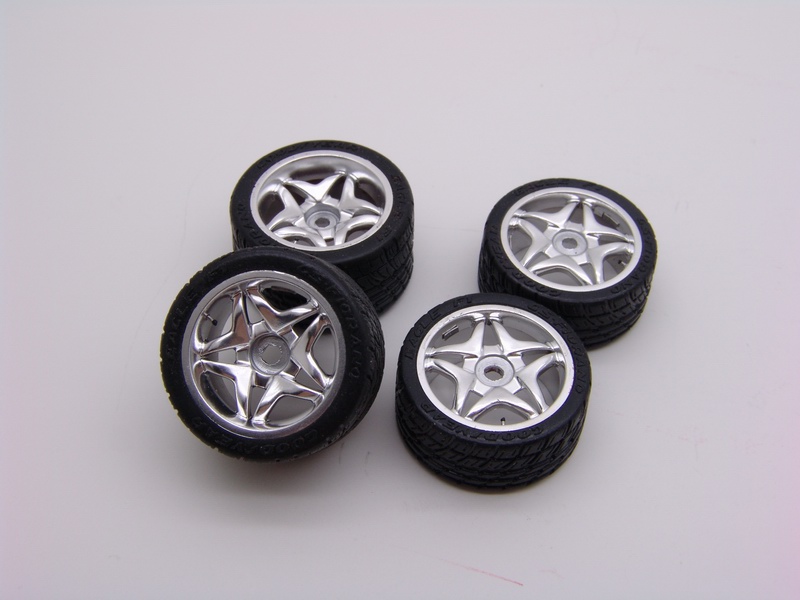
Central lugs on the wheels were removed with Dremel and then I drilled them in the center. Then I made tire valves and wheel weights with silver solder. The wheels are a bit too shiny compared to the real car, but I really liked the way they looked so I just left them as is, |
|
|
After the mesh was shaped to fit, I superglued it to the frame and carefully cleaned superglue residue with sandpaper and needle files. |
|
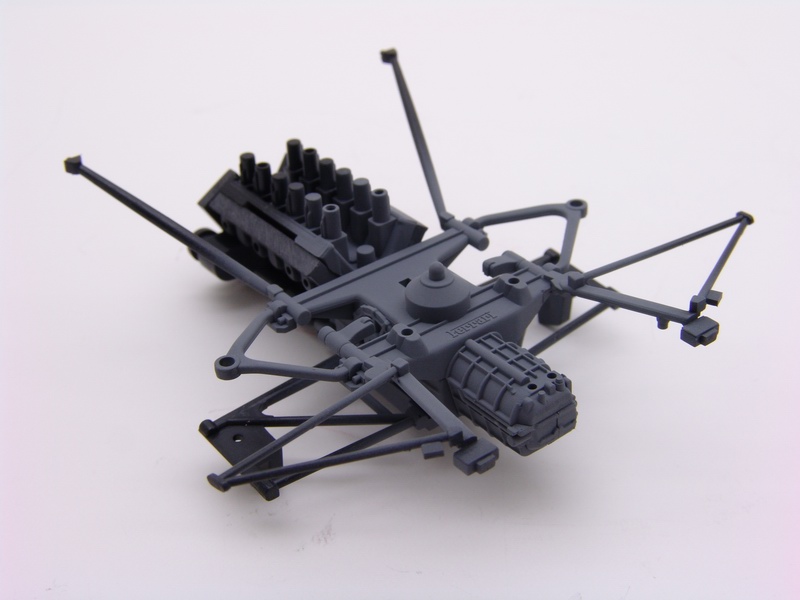
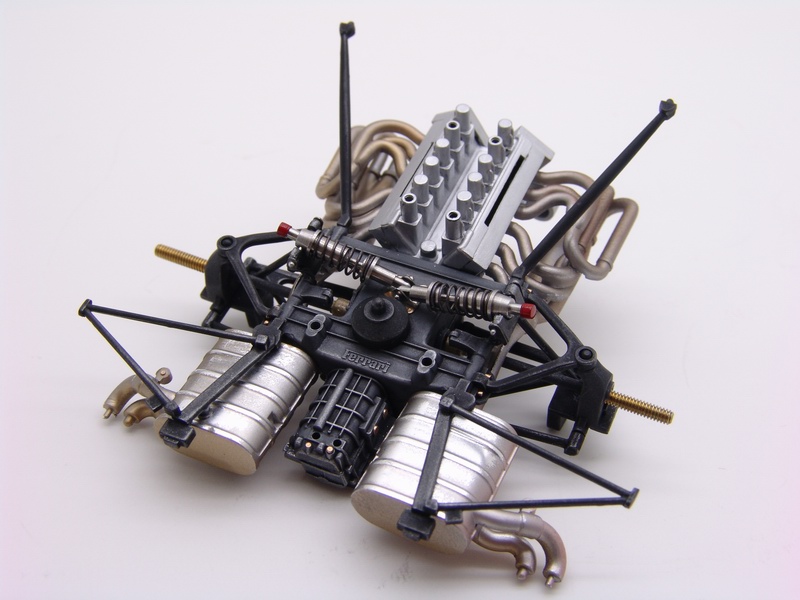
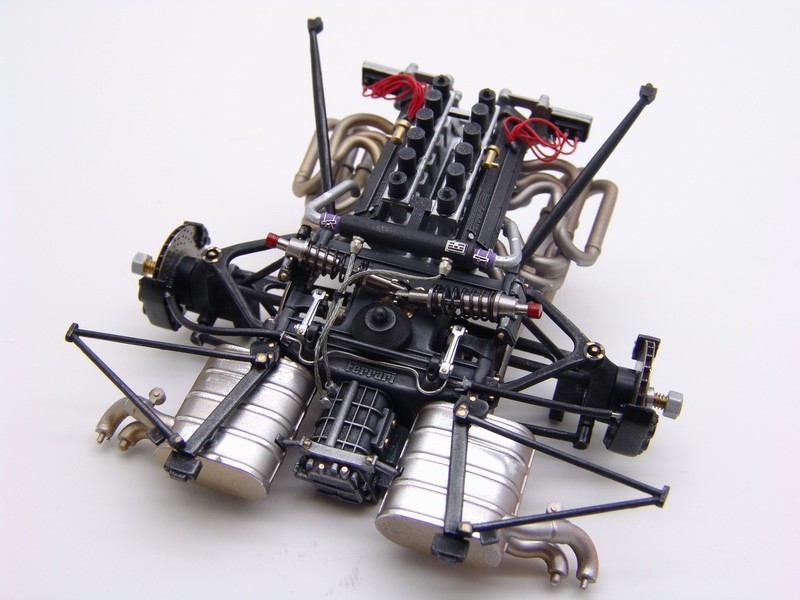
Engine block parts were cleaned, assembled and airbrushed with Tamiya German Grey (I believe) in the gearbox area. |
|
|
The whole thing was painted with semi-gloss black straight from the rattle can. Then I continued to detail it. |
|
Block was painted MM Aluminum, frame painted black, and entire engine weathered/drybrushed with MM Burnt Metal/Aluminum. Then I installed rear axles, dampers, and exhausts. A bit of detail painting was done here and there. |
|
|
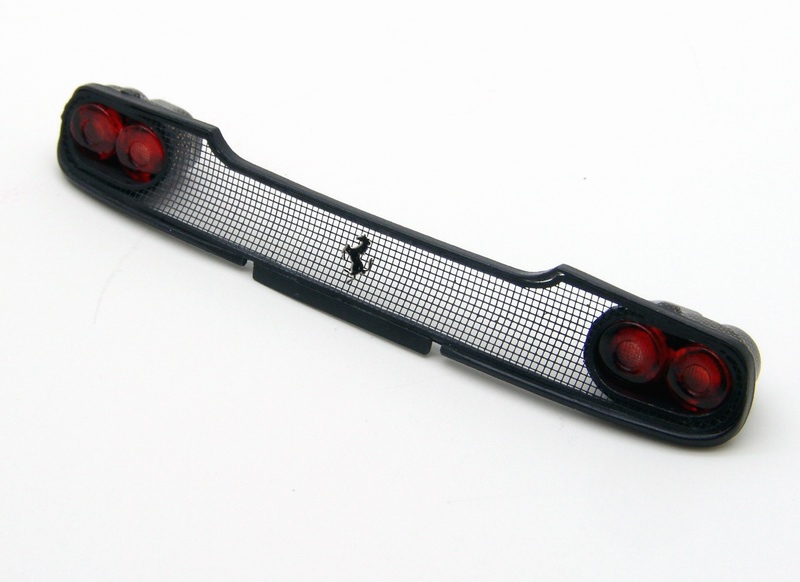
Taillight buckets were carefully decaled with SMS Carbon Kevlar and clear-coated with Future floor polish (I didn't want to risk decals bubbling). |
|
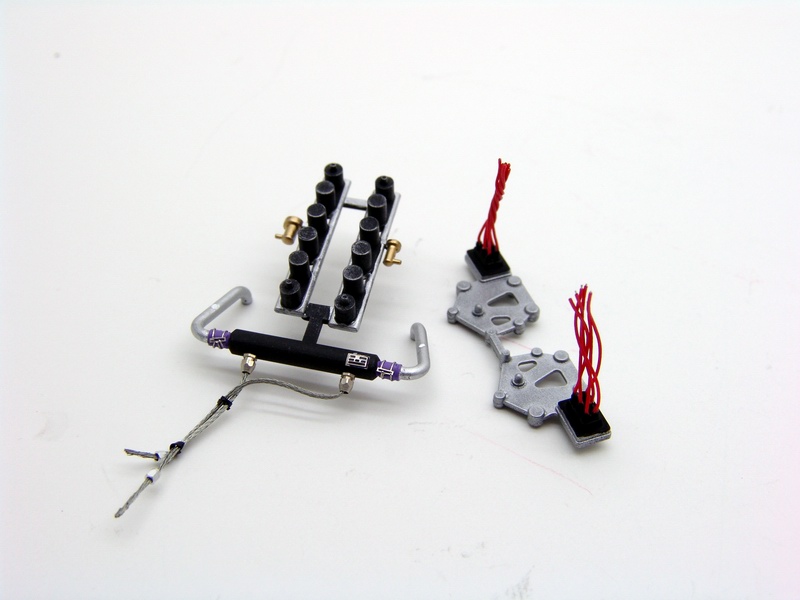
Intake was detail-painted and plumbed using DM braided lines and Sakatsu fittings (clamps are from CM set - somewhat awkward to put on). Distributors were painted, drilled, and wired with MFH detailing wire. Even though real ignition wires were black, I wanted to add a bit of color to the engine bay and went with "aftermarket" wires. |
|
|
After 4-5 coats of Future, decals started to look uniform and I left them to dry for a few hours. After they were completely dry, I tried to install the lights... |
|
Cam covers, intake, and distributors were installed on the block, and ignition wires connected to the cam covers. Then I installed the brakes and plumbed brake hoses to the brake lines, and hooked up oil lines with some small Detail Master fittings. |
|
|
..but not so fast - they didn't quite fit! The mesh opening for the taillights was a little too small, and I had to sand off the sides of already painted tail lights in order to fit them inside the buckets. CM Cavallino was added to finish the grille off. |
|
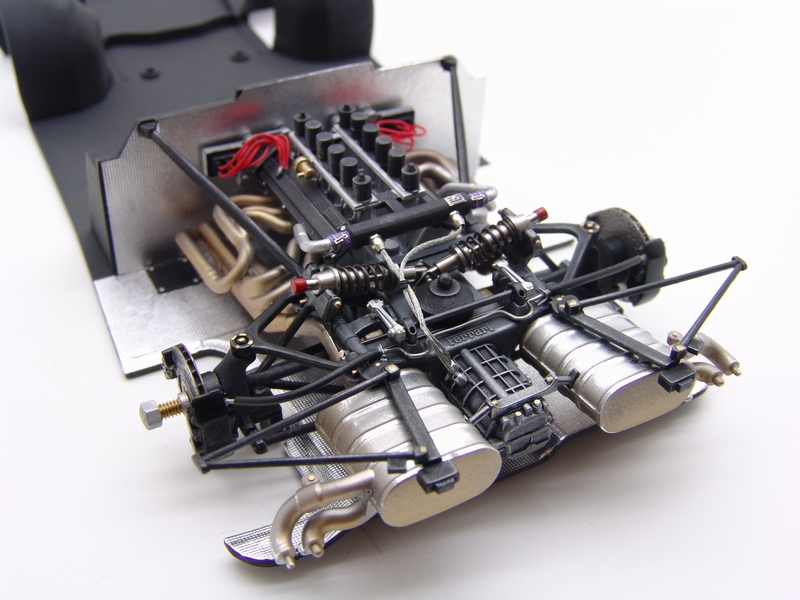
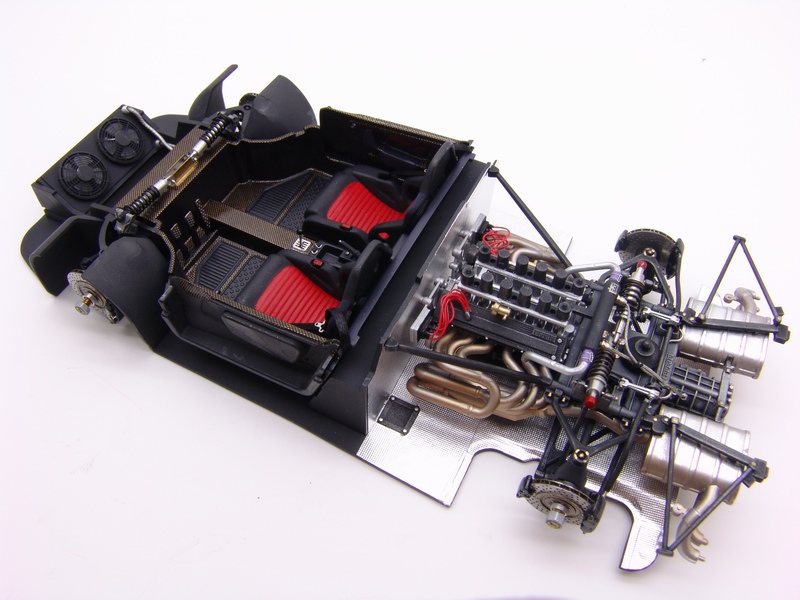
It was mostly assembly work from here - firewall was glued to the chassis, and engine test fitted in the engine bay. |
|
|
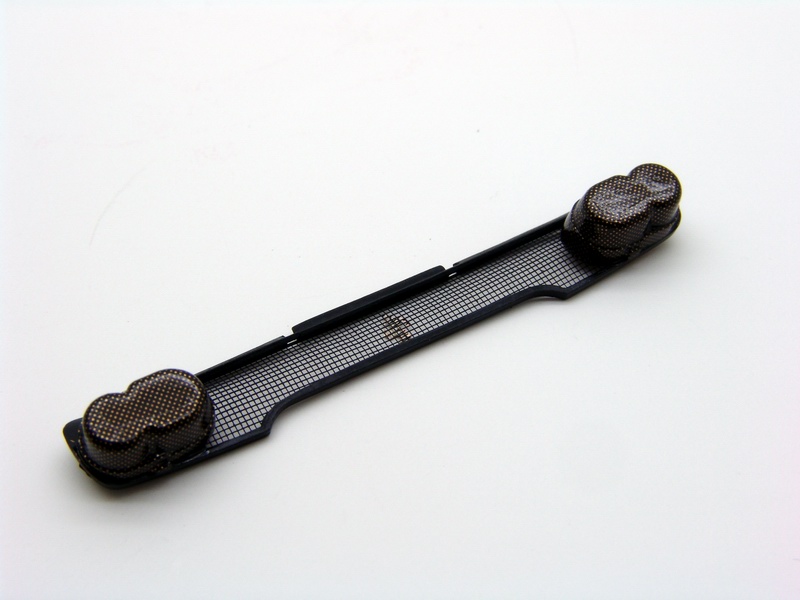
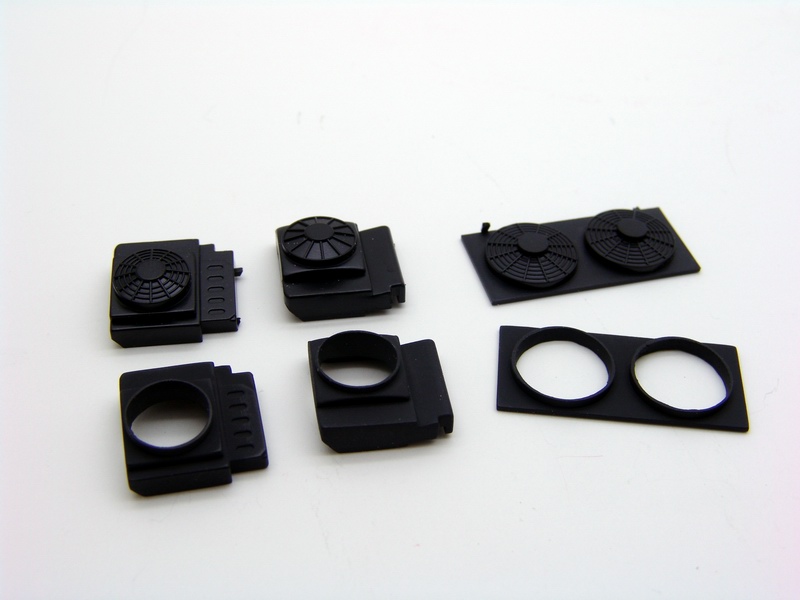
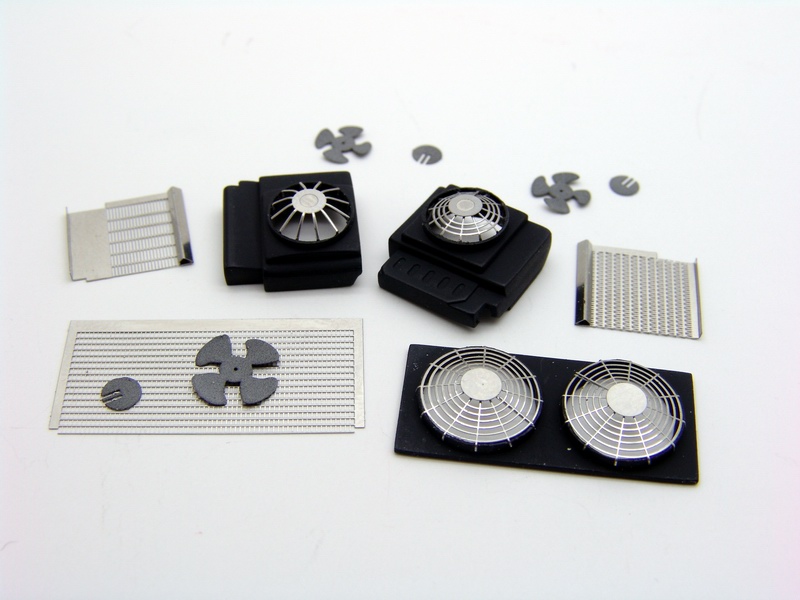
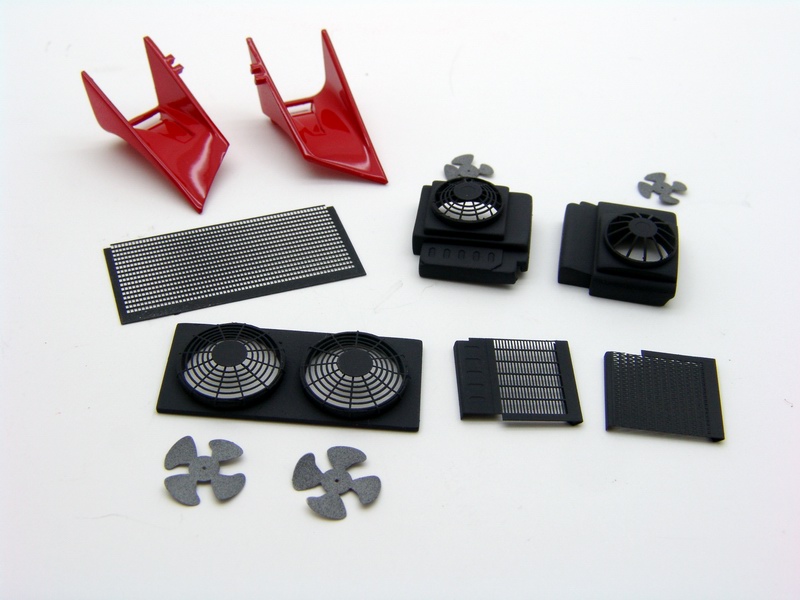
One other thing that I really wanted to improve in this kit is cooling and AC radiators. They are easily seen in the engine bay, and the way Tamiya molded them was just not going to cut it. Fans were drilled out and shrouds' walls were carefully cleaned with round needle files. |
|
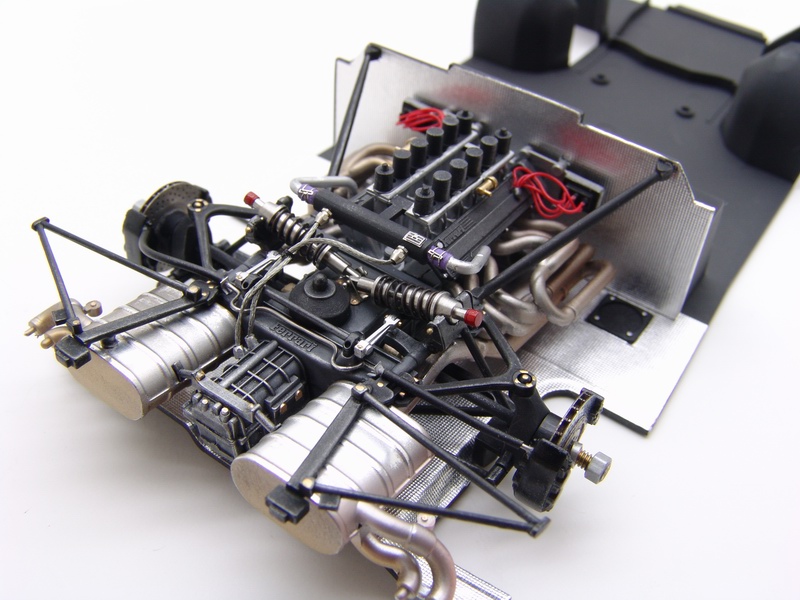
Another view of the engine installed in the engine bay - for some reason it looks like a big spider to me! |
|
|
CM set provides excellent (even though not entirely correct) fan replacements for all (including the front) radiators, and on this picture you could see the parts that I used. Mesh was installed in the shrouds and fans were painted light gray. |
|
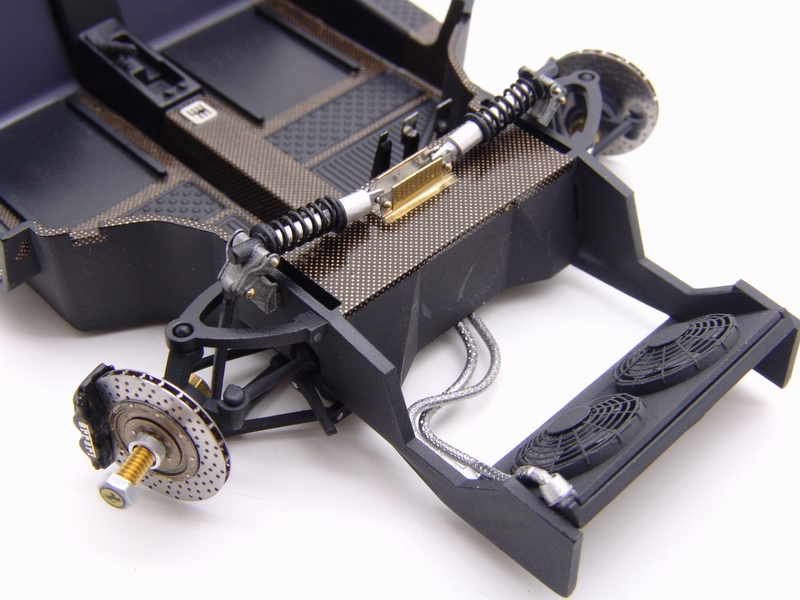
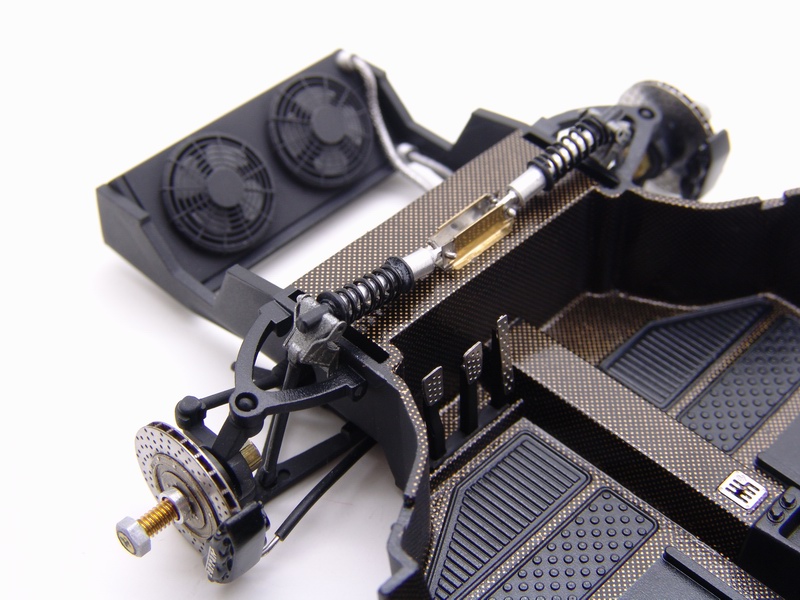
Front brakes, steering rack and front suspension were installed on the interior tub. I also glued on front radiator and plumbed it using home-made fitting and braided lines made from solder. |
|
|
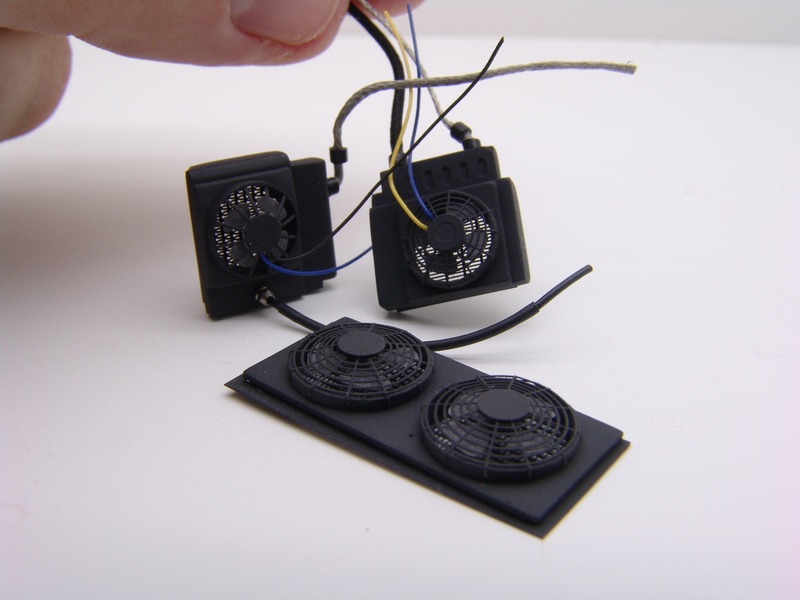
Then radiator bodies were painted semi-gloss black and assembled together. |
|
Pedals were assembled from Crazy Modeler P/E set and installed in the driver's foot well. Its a shame they will be almost invisible cause they are really nice pieces. I commend CM for making such great designs of things that won't be seen on a completed model, for us, detail junkies! |
|
|
After assembly, I wired and plumbed all 3 radiators with various hoses and Detail Master braided lines using Sakatsu (and some home-made) fittings. Here is a picture of completed radiator assemblies. |
|
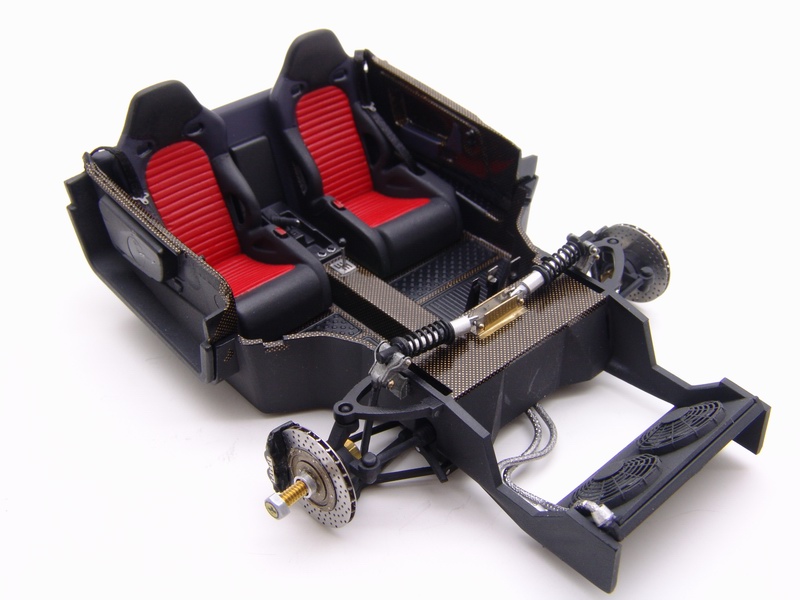
Finally I have installed the seats, attached seat belts, door panels, shifter gate, shifter, hand brake, and detail painted few little knobs and such. |
|
|
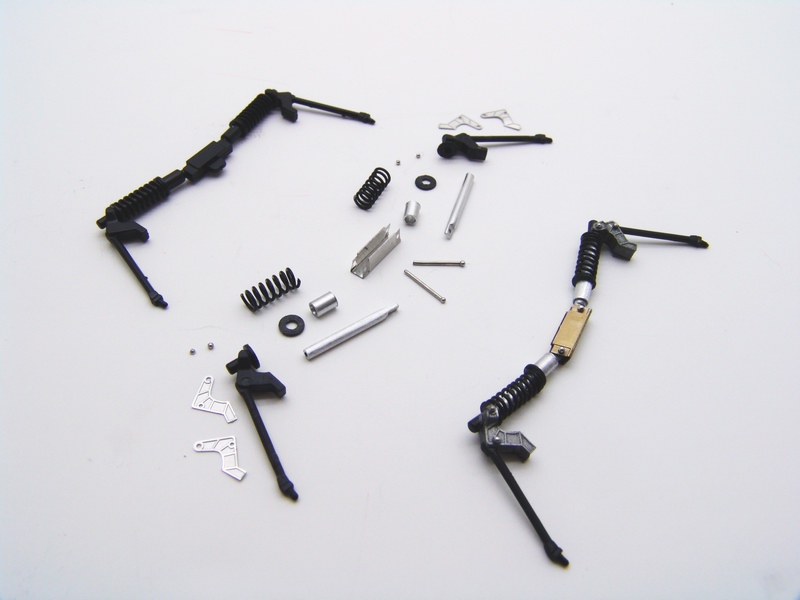
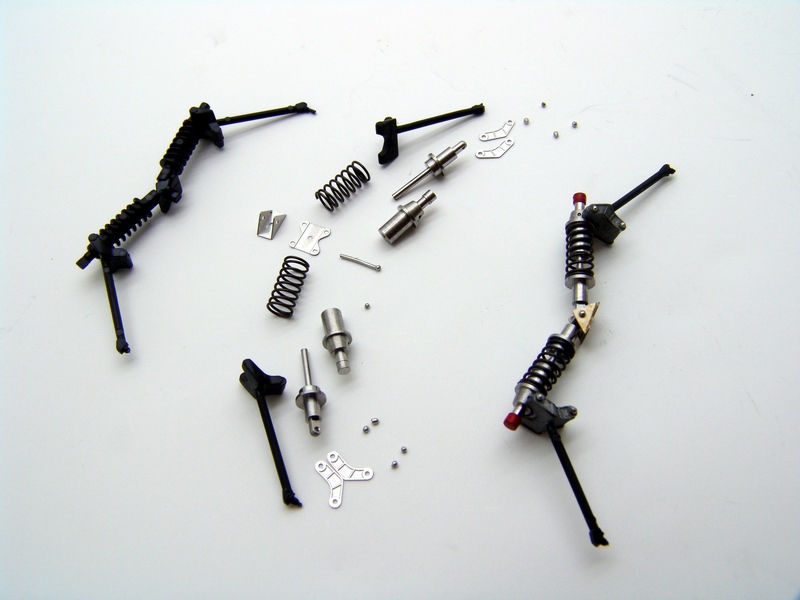
Front suspension was very simplified in the kit. I decided to tinker with it a bit. Using parts of the original suspension, some aluminum tubing of various sizes, black coated wire, some thin solder and parts from Acu-STion shock set I have built new suspension. Top - kit part, middle - parts, bottom - new suspension. |
|
Interior was mostly complete (still missing dashboard). |
|
|
Similar "surgery" was done to the rear suspension part, only I have used few more turned shock parts from Acu-STion suspension set this time around. |
|
Another view of the interior. This is the last time I saw those wonderful pedal assemblies. |
|
|
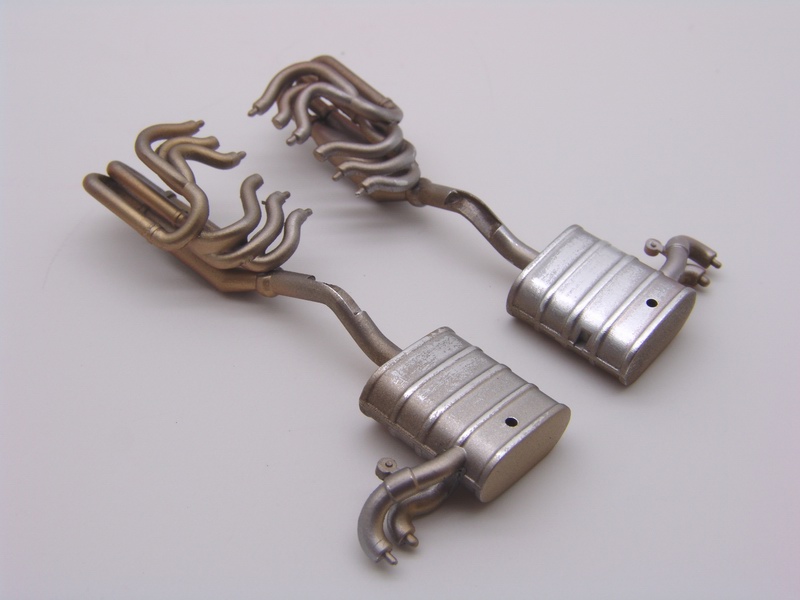
Exhausts were cleaned, assembled and painted. To achieve this "well-used" look, I weathered them with MM Aluminum, Burnt metal, then Alclad Gold plate, then Tamiya clear red and orange, then slightly buffed to reveal original Tamiya chrome plating. |
|
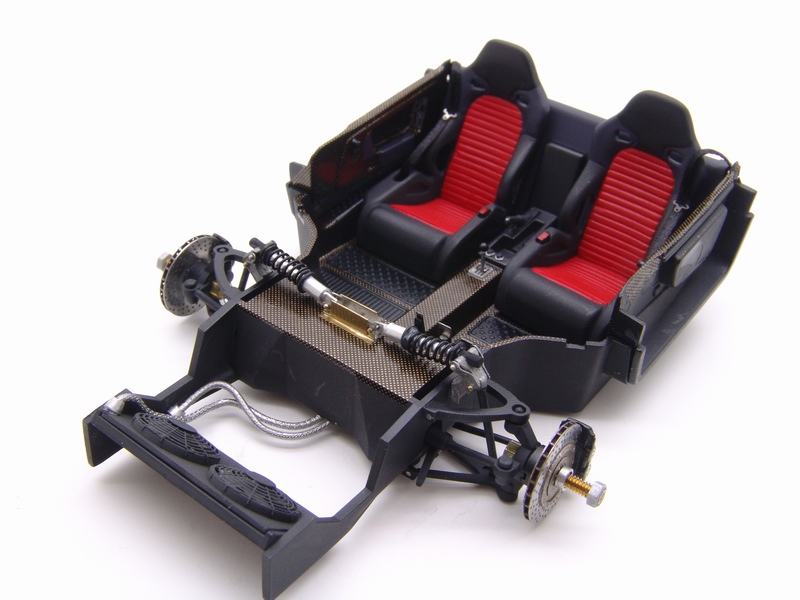
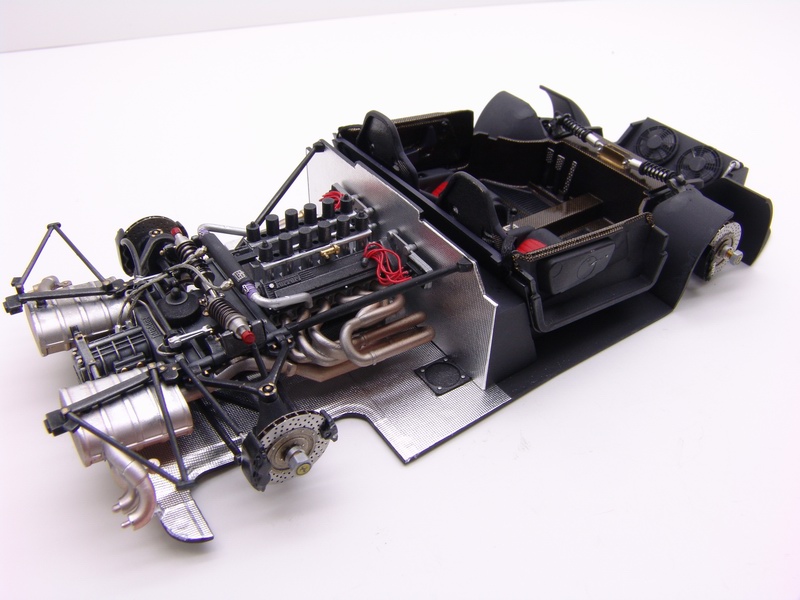
Then interior was mounted on the chassis plate and everything was carefully test fitted to the body. Water lines were interfering with front suspension a bit and wouldn't let he body sit flush in the front, |
|
|
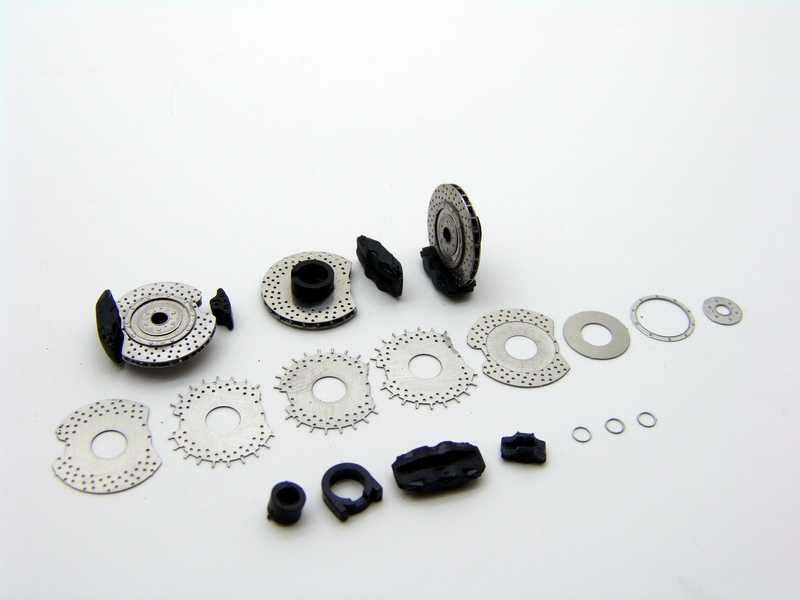
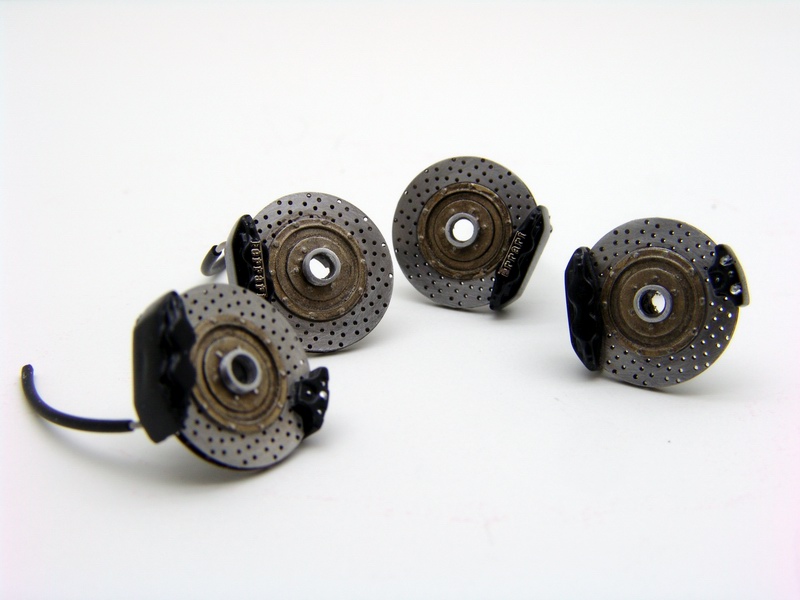
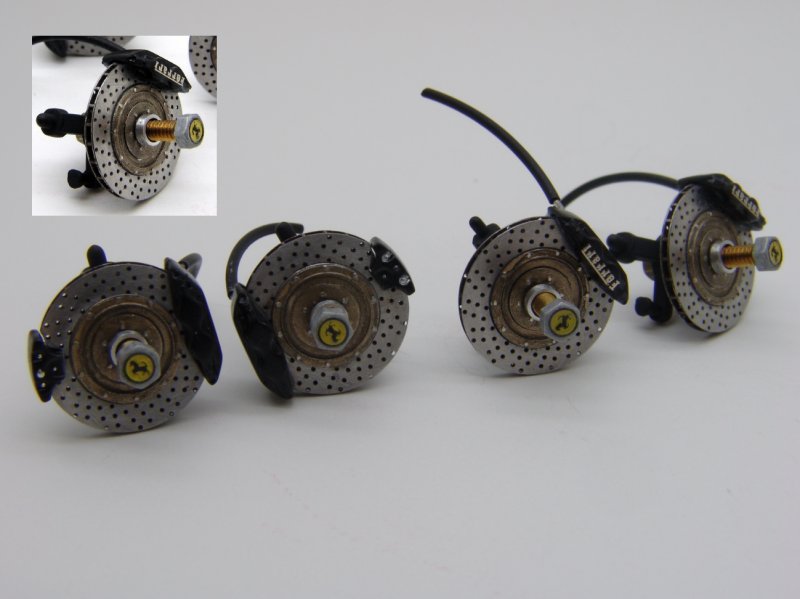
CM brake set is one of the best ones I have seen and worked with. The design of the rotors works very well, and makes a set of very realistic drilled/vented rotors. I have used bosses and calipers from the kit (cut them and made slots with Dremel). 14 parts for each brake disk. |
|
I had to slightly modify front wall of the interior tub and re-route the water lines, so the body would fit over the chassis. |
|
|
Brakes were assembled, painted and weathered with various metallics. I have also detailed calipers with CM metal transfers, and attached brake hoses made from Detail Master hose. |
|
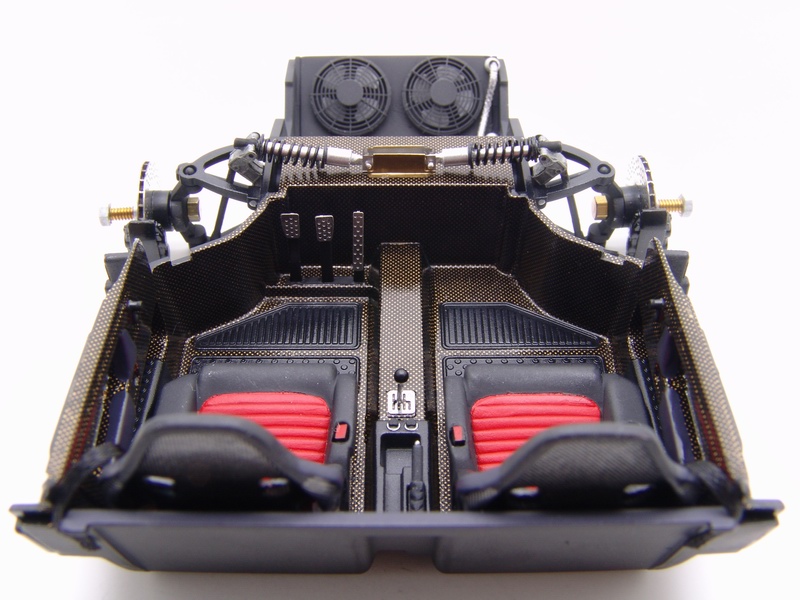
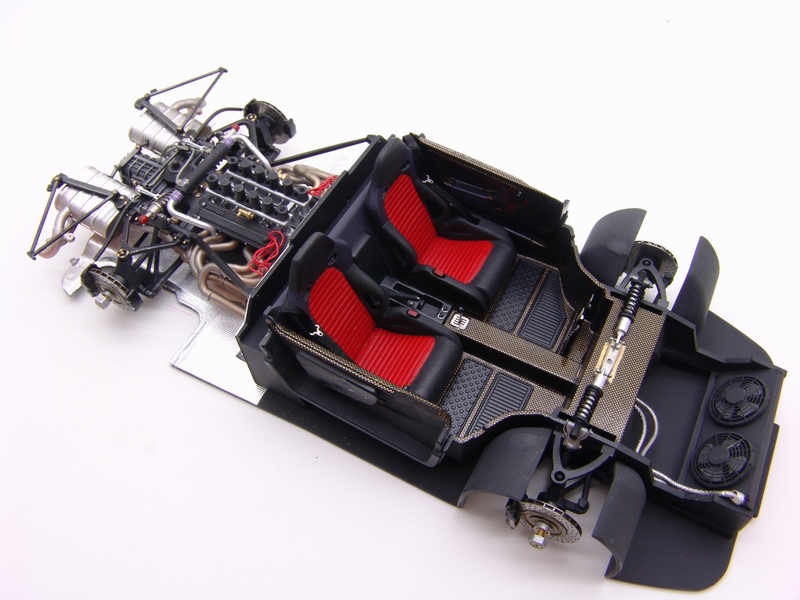
Another view of completed chassis ready for its body. |
|
|
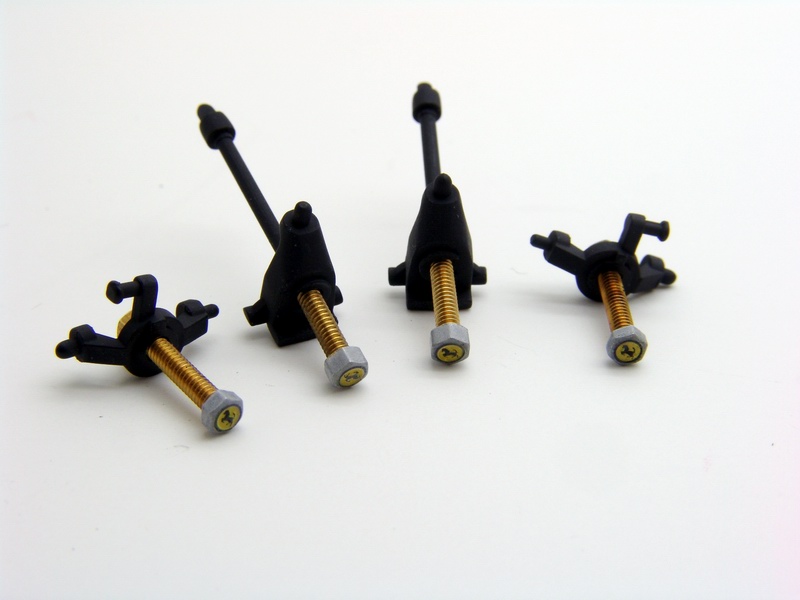
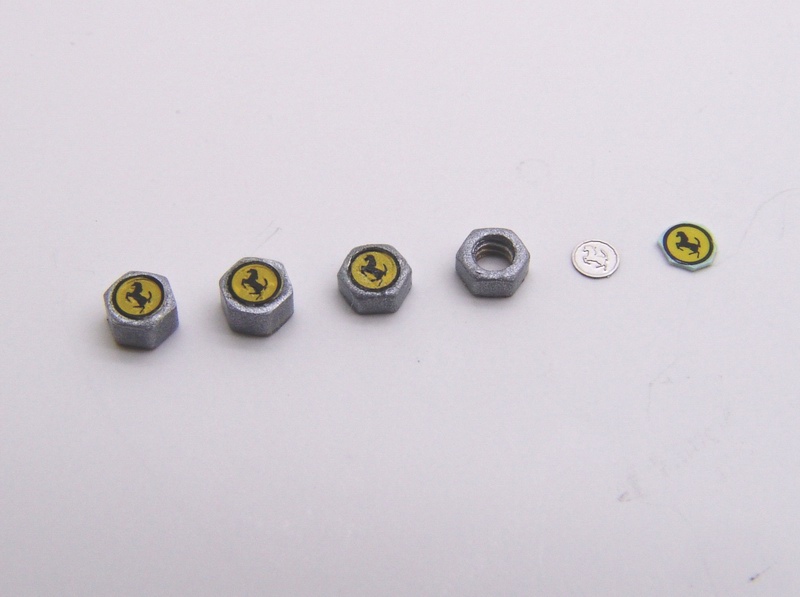
Since I wanted to be able to remove the wheels and show off all this excellent brake detail after model is completed, I made a set of axles with center lug nuts. |
|
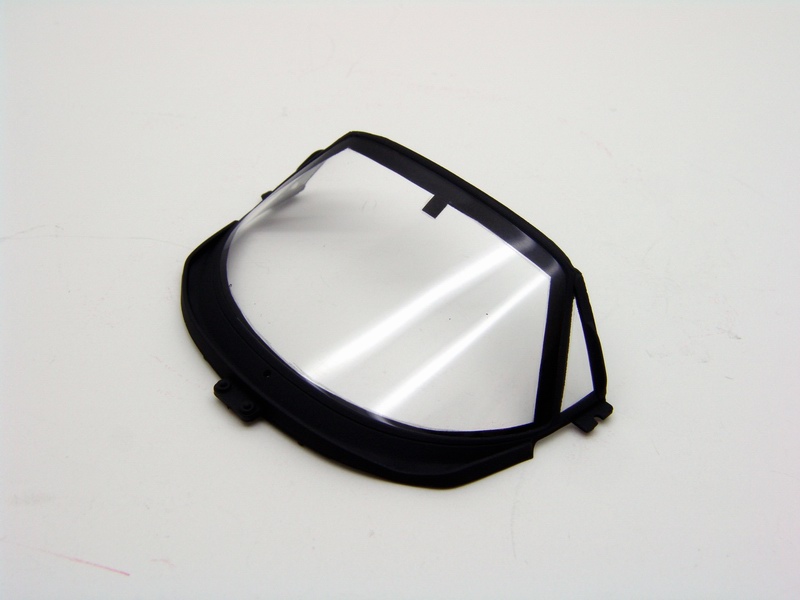
Tamiya provides two versions of the windshield for Barchetta and Berlinetta versions of the car, but since the side glass was way too thick, I chose version without side windows. It was masked off with 400MM Tamiya tape using this technique, and panted flat black. |
|
|
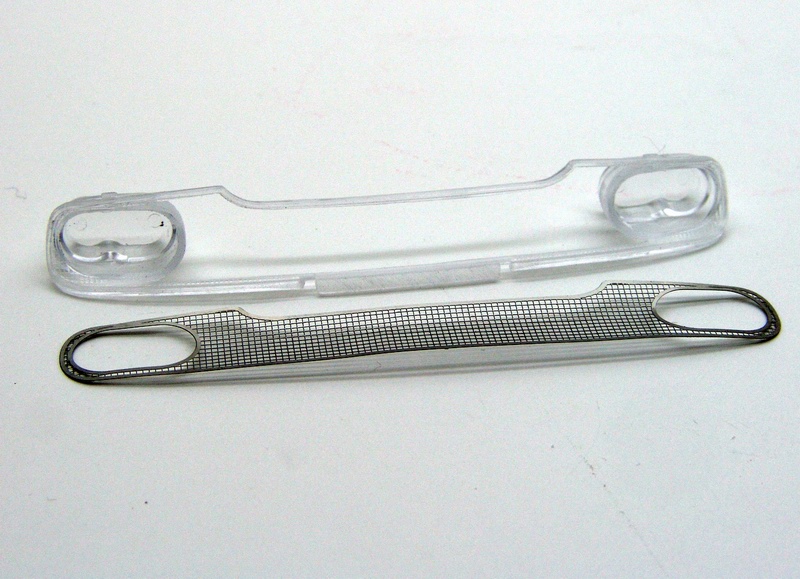
Center lug nuts were painted with MM aluminum, then clear-coated (to prevent chipping when handled) and then topped off with Acu-STion P/E Cavallinos, and kit decals. |
|
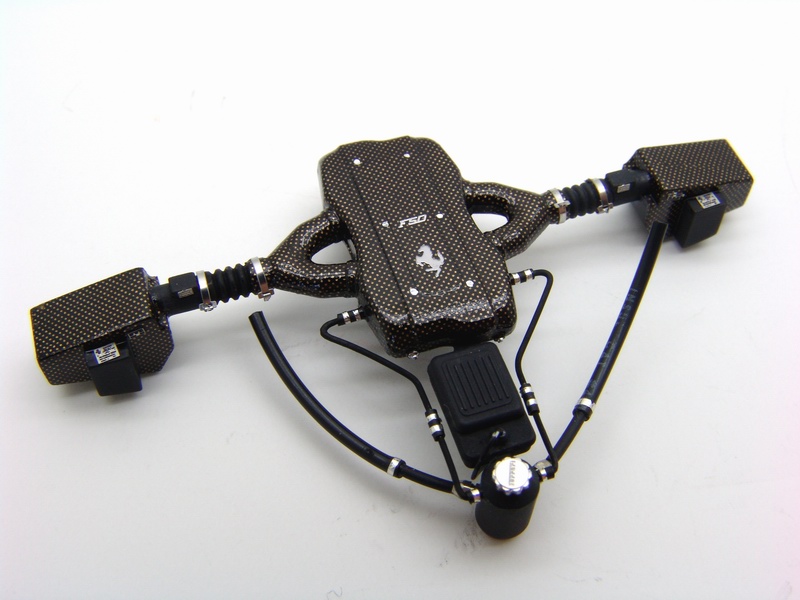
This part is probably the most detailed single part that I have made for any model. In addition to C/F decals applied to many complicated curves, I have replaced all lines and hoses with solder/DM hoses, 4 photoetched clamps from CM set, 4 P/E data plates, 2 metal transfers, 2 Sakatsu fittings, and multiple BMF clamps and P/E cap. |
|
|
Here is a set of completed brakes mounted on the axles with central nuts, ready for installation to the model. All I have to do now is to drill the hole in the center of the wheel to make it removable. |
|
Underside of the engine lid was painted black, and detailed with some Carbon Kevlar and black foam (I used old mouse pad to source the foam). Then everything was put together and polished with Treatment model wax. The supercars were finished! |
Copyright 2007 Alex Kustov. No copying or reproduction in any shape or form without written permission of the author.